Get 10% descount on first project
Damp Proofing Done Right: Properly Removing Bridging Render and Pebble Dashing
When it comes to protecting your home from moisture and damp issues, few things are as crucial as a properly functioning damp-proof course (DPC). Unfortunately, many older homes—and even some newer ones—suffer from bridging render or pebble dashing that bypasses the DPC, allowing moisture to travel up the wall and into the property.
In this blog, we’ll take you through a professional damp-proofing project step-by-step, showing you how to correctly remove bridging render, protect your home during the process, and apply a new finish that respects the DPC. Whether you’re a DIY enthusiast or a homeowner seeking knowledge, this comprehensive guide is designed to educate and empower.
Understanding the Problem: Bridging the Damp Proof Course
What is DPC Bridging?
DPC bridging occurs when render or other materials extend below the DPC line, effectively creating a moisture pathway that allows water to bypass the damp-proof barrier. This can result in:
- Internal wall dampness
- Mold and mildew growth
- Structural damage over time
Why It Happens
This usually happens due to:
- Incorrect application of render or pebble dash
- Lack of understanding of DPC levels
- DIY or rushed renovation jobs
Step 1: Assessing and Preparing the Worksite
Preparation is key in any professional damp-proofing job. In this project, we started by identifying where the render had bridged the DPC. The existing render went all the way to the floor, creating a clear path for moisture.
Protection Layers Used:
- Polythene sheet – Acts as a waterproof barrier
- Chipboard layer – Absorbs impacts and protects flooring
- Tarpaulin – Makes cleanup easier and reusable stone recovery possible
This layered approach ensures both effective protection and easier post-job cleanup.
Step 2: Marking and Cutting the Render
Using a straight chalk line (torque line), we marked the perimeter just above the DPC to allow space for applying a bead. This precision is crucial to ensure future moisture has no route back into the structure.
Tools Used:
- Milwaukee angle grinder with diamond cutting blade
- Makita demolition hammer for render removal
These heavy-duty tools make quick work of cutting and chiseling away the old material without damaging the underlying wall.
Step 3: Cleaning and Priming the Surface
Once the render was removed, we cleaned up all the rubble and dust using a commercial-grade vacuum. Despite vacuuming, old bricks remain porous, so a specialist water-based primer was applied generously.
Pro Tip: For high-suction bricks, use water-based primers over universal red primers for deeper penetration and better results.
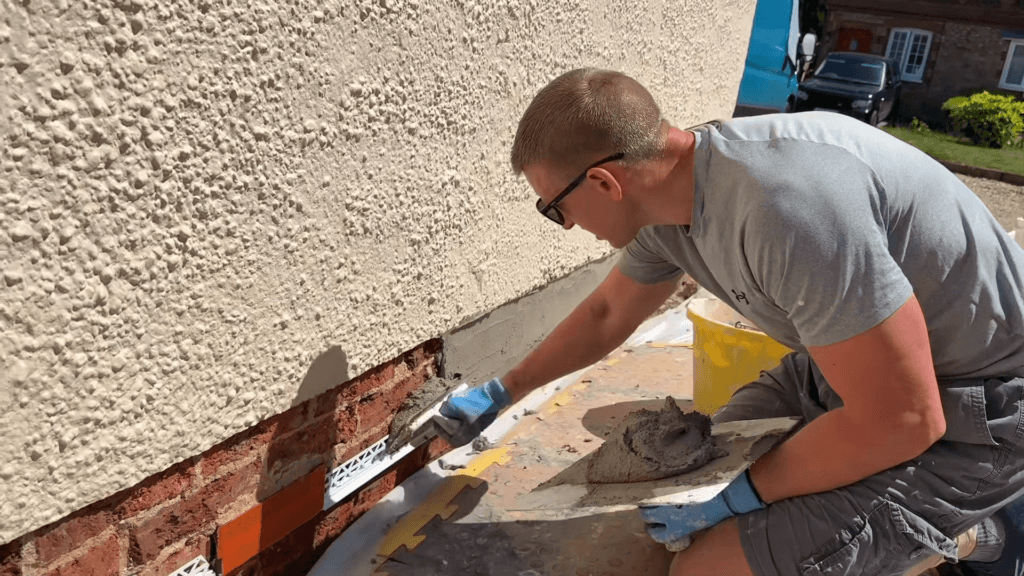
Step 4: Installing Drip Beads Correctly
Why Drip Beads Matter:
Drip beads prevent moisture from running down and re-entering the wall. Without them, water can wick back up into the structure over time.
We used a specialist gold-standard drip bead with a lip that ensures water drips away from the wall. A full thick bead of strong sealant glue was applied along the DPC line before positioning the bead.
Benefits:
- Extends the effectiveness of the DPC
- Prevents bridging by render
- Holds the bead securely until rendering is complete
Step 5: Applying the Render (Scratch and Top Coats)
Scratch Coat:
The first layer, or scratch coat, was applied and textured with a special tool that looks much like an afro comb. This rough texture ensures the topcoat adheres properly.
We used 14mm drip beads to match the existing wall’s depth and ensure a seamless finish.
Top Coat:
The top coat needs to be around 8-10mm thick to hold the pebble dash properly. Since this was a pebble-dash finish, extra care was taken to apply it evenly and flush with the existing old render.
Note: Older pebble dash finishes can appear sparse due to decades of weathering, but once painted, they blend seamlessly with new applications.
Step 6: The Pebble Dashing Process
We used 10mm P shingle stones, ideal for most residential finishes. On warmer days, it’s crucial to soak the wall several times to prevent the render from drying too quickly.
Key Tips:
- Hose the wall before applying pebbles
- Keep the site clean with tarpaulin to catch falling stones
- Reuse clean stones to save money and reduce waste
Despite newer tools available, we prefer hand application for better control, especially in technical or small areas.
Step 7: Final Touches and Cleanup
Once the stones are on, we clean the area thoroughly. Leaving cement or stone debris can cause staining and may require expensive acid cleaning later.
Cleanup Tools:
- Vacuum for crevices
- Multiple trowel sizes for finishing tight corners
- Spirit level for ensuring straight, clean lines
After the job is complete, it’s hard to tell we were even there—other than the much-improved protection from damp!
Bonus Tip: Don’t Forget the Guttering
Improperly fixed or leaky gutters can undo all the hard work you’ve put into your damp-proofing. Always check and secure gutters to ensure they channel water away properly.
Final Thoughts
Bridged damp courses can lead to serious structural and moisture-related issues. Fortunately, with the right knowledge, tools, and techniques, it’s entirely possible to correct these problems and future-proof your property.
Whether you’re hiring a professional or considering tackling it yourself, always ensure that the render never crosses the DPC line and that proper protection and finishing materials are used throughout the process.
Ready to Protect Your Home from Damp?
If you found this guide useful, make sure to share it with others, leave a comment below, or subscribe to our YouTube channel for more expert tips.
Stay dry and protected!
Keywords: damp proof course, DPC bridging, render removal, pebble dash application, moisture protection, house damp solutions, sealant for DPC, how to install drip bead, waterproofing exterior walls


