Get 10% descount on first project
How We Repaired a Ceiling Collapse: From Old Lath & Plaster to Modern Acoustic Elegance
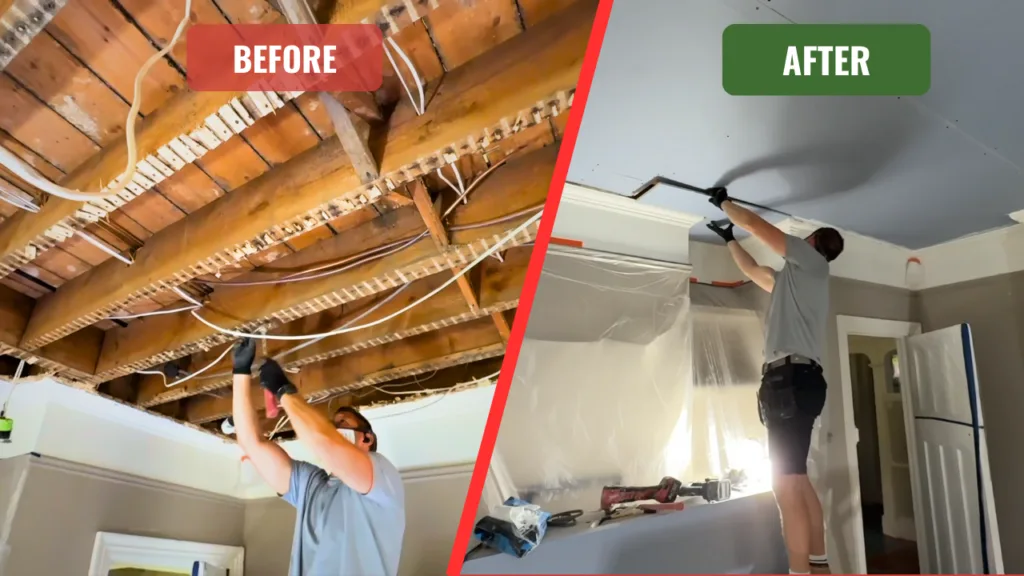
In the world of plastering, few tasks are as challenging—or as rewarding—as restoring a high, water-damaged ceiling. At Daniel Lee Plastering and Rendering, we recently tackled a remarkable ceiling transformation that involved replacing traditional lath and plaster with modern acoustic boarding and finishing it with a sleek shadow gap bead. This wasn’t just a repair; it was a complete upgrade.
If you’re a homeowner dealing with ceiling damage, or a fellow tradesperson looking for insight into professional ceiling restoration methods, this blog post will take you through our full process, tips, tools, and techniques.
What Caused the Ceiling Collapse?
This beautiful property boasted impressive 2.8-meter-high ceilings, originally crafted using traditional lath and plaster methods. However, due to a leak that penetrated the ceiling, extensive water damage occurred, making a full ceiling replacement necessary.
Before any demolition began, protection was our priority. We fully sheeted the floor and laid tarpaulins to safeguard the workspace. Then came the hard part—removing the compromised ceiling.
Step-by-Step Ceiling Restoration Process
1. Stripping Back the Old Lath and Plaster
The ceiling was carefully stripped back to expose the joists. This wasn’t a small job—it was a mammoth task, as any plastering professional can tell you. Removing decades-old lath and plaster involves:
- Extracting hundreds of nails
- Clearing debris safely
- Prepping for new materials
Our team handled it with precision. Once everything was clear, it was time to rebuild.
2. Installing Two Layers of Plasterboard for Strength and Acoustics
Rather than using a single layer of board, we opted for two distinct layers:
- Layer 1: Blue acoustic soundboard for enhanced soundproofing and structural integrity.
- Layer 2: Standard plasterboard to provide a smooth finish.
💡 Pro Tip: Using a dual-layer system significantly increases rigidity, reducing the chances of future sagging or sound transfer.
Additionally, we added extra noggins—horizontal wooden blocks between joists—to support the heavy boarding and allow for secure screw placements.
3. Working on Stilts: A Bit of Fun, a Bit of Danger
With ceilings at 2.8 meters, getting up close meant using stilts on the highest setting. While this may seem daunting, it’s a faster alternative to hop-ups or scaffold towers once you’re confident with them. Our apprentice Ethan had a go—hesitant at first but soon mastering balance and mobility.
🛠 Safety Tip: Always clear the workspace and use spotters when walking on stilts, especially at maximum height.
4. Cutting and Shaping Dense Soundboard
Soundboard is notably denser and more fibrous than standard plasterboard, making it tougher to cut—especially for L-shapes and corners. For this project, we used:
- Stanley knife for straight cuts
- Multi-tool for precision L-shape details
⚒️ Tool Highlight: A multi-tool offers clean, controlled cuts without compromising board integrity. Ideal for working around beams, pipes, or light fixtures.
5. Marking and Installing the Second Layer
Once the first layer was installed, we used string lines and careful markings to identify joist locations. This made installing the second layer quick and accurate. Every board was fully screwed for maximum durability.
Shadow Gap Finish: A Modern, High-End Touch
With the boarding complete, it was time to introduce a luxury design feature: the shadow gap bead.
What Is a Shadow Gap?
A shadow gap bead creates a minimalist recess between the ceiling and the wall, replacing traditional coving. It adds a contemporary, high-end architectural detail that enhances the perception of space and clean lines.
Installation Tips:
- Leave a consistent channel around the ceiling perimeter
- Use strong snips to cut the beads to precise angles—ours came with degree markers for mitered corners
- Apply adhesive generously and evenly
- Ensure beads are flush before plastering
⚠️ Warning: Cutting shadow gap beads requires strong hands or pro-grade snips—don’t underestimate this step!
Final Plastering & Finishing Touches
With the shadow gap beads in place, the ceiling was now ready for plastering. This stage requires:
- Skilled trowel work to ensure seamless joins
- Stilts again, for reach
- Clean environment to prevent dust from contaminating the plaster
Our team executed it flawlessly, delivering a smooth, professional finish that revived the ceiling and gave the room a crisp, modern feel.
Why Choose Acoustic Boards and Shadow Gap Finishes?
This project wasn’t just about repairing damage—it was about modernizing the ceiling while improving functionality and style. Here’s why you might consider this approach:
Benefits of Acoustic Boards:
- Sound reduction between floors
- Increased ceiling strength
- Better insulation options
Benefits of Shadow Gap Finish:
- Sleek, modern look
- Eliminates need for traditional coving
- Cleaner transitions between ceiling and wall
Tools We Recommend for Ceiling Restoration
- Stanley Knife
- Multi-tool for precision cuts
- Drywall Stilts (with safety training)
- Shadow Gap Bead Snips
- Strong adhesive for bead installation
- Screw gun and stud finder
- String line for alignment
Final Thoughts: Elevating Ceilings, One Board at a Time
Restoring a damaged ceiling isn’t just about patching things up—it’s an opportunity to upgrade your living space, improve acoustic performance, and add architectural style. Whether you’re a homeowner considering a ceiling makeover or a fellow tradesperson learning the craft, we hope this behind-the-scenes look gave you inspiration and insight.
💬 Have questions about ceiling restoration or want to learn more about acoustic boards and shadow gap beads? Drop a comment below!
📺 Don’t forget to check out the full video of this transformation on YouTube:
👉 Watch Now
📌 Need help with your own plastering project? Visit:
🌐 danielleeplastering.com
And if you found this blog helpful, please share it with others looking to enhance their homes with professional plastering techniques!


