Get 10% descount on first project
Garage Rendering in SK: A Not-So-Average Holiday Project
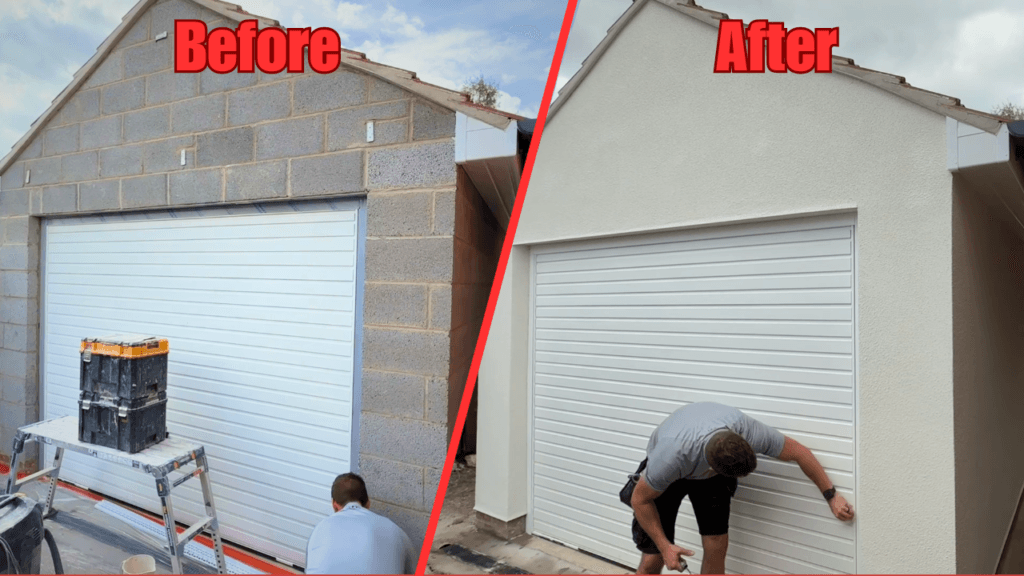
Not Your Average Holiday: Rendering a Garage in Sunny SK
When most people think of holidays, they imagine sun, sand, and relaxation. But for us, this trip was anything but typical. Instead of lounging around, we rolled up our sleeves and got to work on a family garage rendering project in sunny SK. Blending a bit of family time with professional craftsmanship, this “working holiday” turned into a rewarding challenge filled with lessons, laughs, and a beautifully finished structure.
Setting the Scene: A Sunny Start in SK
We kicked things off on a bright and cheerful morning, setting our sights on my uncle’s newly built garage. With the sun shining and spirits high, we began preparations for the project. The goal? Deliver a clean, professional render that would withstand the elements and enhance the look of the property.
Before diving in, we laid down all necessary protection: drop sheets to cover the floors, careful masking around the edges, and taped-up gutters and plastics. Our top priority was ensuring no accidental splatters would damage the pristine surroundings—a step that proved essential, especially once the rain started.
Prepping and Beading
Chris and Ethan got to work immediately, applying drip beads and bell beads around the garage openings. The importance of this phase can’t be overstated. Beading is essential to define corners and edges while supporting the render, helping achieve a neat and long-lasting finish. Once all beads were glued and secured, we allowed them to harden before moving on to the base coat.
Rain, Rain, Go Away
Of course, no outdoor project is complete without a little weather drama. Light rain began to speckle our workspace just as we started applying the base coat. Thankfully, our shelter and solid groundwork allowed us to continue.
We used Eco Rend 32 One Coat Base, known for its durability and eco-friendly formulation. Despite the moisture, we managed to apply the initial coats to a couple of sides before calling it a day. The lesson here? Weatherproofing is essential, but knowing when to pause is just as important.
A Wet Delay and a Solid Return
Persistent, non-stop rain meant returning to the site the next day to check our progress. Luckily, the base coats held strong despite the soggy weather. We resumed with a fresh team (any helping hands welcome!) and finished the first pass with a notched trowel, creating the perfect surface for layering.
Once the initial coat was set (but not fully hardened), we applied a very thin second coat to cover the mesh fully. This helps create a smooth, consistent surface—essential for achieving a flawless final finish.
The Power of Protection
One key takeaway from this project? Always fully protect your surfaces.
- Use durable drop sheets and pin them down if it’s windy.
- Tape off plastics and edges.
- Clean as you go, especially when using a render spraying machine.
The rendering machine we used had serious power and would spray material at a high velocity, making splatters almost inevitable. Good protection saved us from hours of unnecessary cleanup.
Final Touches: Priming and Top Coating
Once the base layers dried, it was time to prime the entire surface. This step does more than just prepare the wall for the final coat:
- It seals the render beneath.
- Enhances adhesion for the top coat.
- Adds uniformity in colour.
We gave the primer a full 24 hours to dry, even though it looked dry to the touch much sooner. It’s always best to follow product recommendations for curing time—rushing this phase can compromise the finish.
Silicone Top Coat Application
With everything prepped and dried, it was time for the grand finale: 1.5mm grain silicone render applied with a 4mm blue spray nozzle.
Why Silicone Render?
- Water-resistant
- Flexible and crack-resistant
- Breathable and long-lasting
- Offers a sleek, coloured finish
Chris took the lead on spraying and powered through like a champ. The results? A beautiful, smooth, and clean render that started drying to the touch within an hour. The finish was even, flawless, and ready to stand the test of time.
Tools and Materials Used
- Eco Rend 32 One Coat Base
- 1.5mm Silicone Render
- Notched Trowel
- Spray Render Machine with 4mm Nozzle
- Drop Sheets, Masking Tape, and Beads
- Mesh for Strength and Durability
Key Tips for Successful Garage Rendering
- Prep is Everything: Protect all surfaces meticulously.
- Be Patient with Weather: Rain can delay work, but it shouldn’t ruin results.
- Layer Wisely: Apply a thin second coat over mesh for smoothness.
- Prime Properly: Let primer cure for at least 24 hours.
- Spray Evenly: Use the correct nozzle size and consistent pressure.
Wrapping Up the Project
From unexpected showers to flawless finishes, this garage rendering project reminded us that with the right tools, teamwork, and planning, any challenge can be turned into a success. Whether you’re a DIYer or a seasoned pro, there’s always something to learn from real-world site experiences.
If you found this blog helpful, or if you’re planning a rendering project of your own, don’t forget to subscribe to our YouTube channel, share this post, and leave a comment with your thoughts or questions.
Stay tuned for more rendering tips, tutorials, and transformations!


