Get 10% descount on first project
Dot and Dab Plasterboarding Guide: How to Dryline Brick Walls Perfectly
Introduction
Renovating an older property often reveals a common nightmare: crumbling plaster and uneven brickwork. When you strip a room back to its bare bones, you are faced with a choice. Do you spend days applying wet backing plaster, waiting for it to dry? Or do you opt for a faster, modern solution that guarantees a perfectly flat finish?
For many professionals and serious DIYers, the answer is Dot and Dab (also known as drylining).
In this guide, we are taking you through a complete bedroom renovation where the walls have been stripped back to bare brick. We will walk you through the entire process of fixing plasterboard using drywall adhesive, turning a dusty, damaged shell into a crisp, modern room ready for skimming.
From the critical importance of priming to the art of leveling boards for the perfect skirting line, here is everything you need to know about the dot and dab method.
Phase 1: Site Protection and Preparation
One of the hallmarks of a professional trade is respect for the client’s home. Plastering and drylining are inherently messy jobs involving dust, water, and sticky adhesive. Before a single bag of material is opened, the room must be fortified.
Choosing the Right Protection
If you are working in a furnished home, protecting the flooring is non-negotiable. Different floors require different protection strategies:
- Carpets: Use a specialized sticky carpet protector (often clear). This adheres to the fibers and prevents dust from working its way underneath.
- Hard Floors (Wood/Tile/Laminate): Never use the sticky carpet protector here, as it can leave a residue or damage the finish. Instead, use a “multi-surface” protector (often red or blue) which has a lower tack, or use heavy-duty tarping and tape.
Pro Tip: Even if the room is going to be re-decorated, protect the subfloor or floorboards. It makes the final cleanup significantly easier. Peeling up a sheet of plastic full of dried adhesive is much faster than scraping droppings off wooden floorboards for hours.
Phase 2: Priming the Substrate (The Most Critical Step)
In our project, the customer had already removed the old plaster, leaving exposed, dusty brickwork. This presents a specific challenge: Suction Control.
Understanding High Suction
Old bricks are often dry and porous. If you apply wet adhesive directly to them, the bricks will act like a sponge, sucking the moisture out of the glue almost instantly. This is known as “flash drying.”
When adhesive dries too fast, it doesn’t cure properly. It becomes brittle, weak, and can eventually cause the plasterboard to “pop” off the wall—a disaster you want to avoid.
The Solution: PVA or Primer
To prevent this, you must apply a primer or a diluted PVA solution to the walls.
- Dust Control: The primer binds all the loose dust and debris that brushing didn’t catch.
- Sealing: It creates a barrier that slows down the absorption rate of the brick.
- Adhesion: It provides a tacky surface for the adhesive to grab onto.
Allow the primer to dry or become tacky (depending on the product instructions) before you begin applying your dabs.
Phase 3: Materials and Mixing
For a standard room renovation, estimating materials correctly is key to a smooth workflow.
The Materials
- Plasterboard: We used standard 12.5mm wallboards (2.4m x 1.2m).
- Drywall Adhesive: Often called “bonding compound” or “dri-wall adhesive.”
- The Ratio: A general rule of thumb is that one 25kg bag of adhesive will cover approximately 2.5 boards. However, this varies depending on how uneven your walls are. If the walls are bowed or rough, you will need thicker dabs to level it out, increasing your material usage.
Mixing the Adhesive
You need a heavy-duty mixing drill for this. A standard cordless combi-drill will likely burn out under the strain.
- Clean Water: Always start with clean water in a clean bucket. Old residue can make the new mix go off (set) too quickly.
- Add Powder: Add the powder to the water, not the other way around, to avoid dry clumps at the bottom.
- Consistency: You are looking for a thick, creamy consistency—stiff enough to hold its shape on the wall without sliding down, but wet enough to be malleable when you press the board against it.
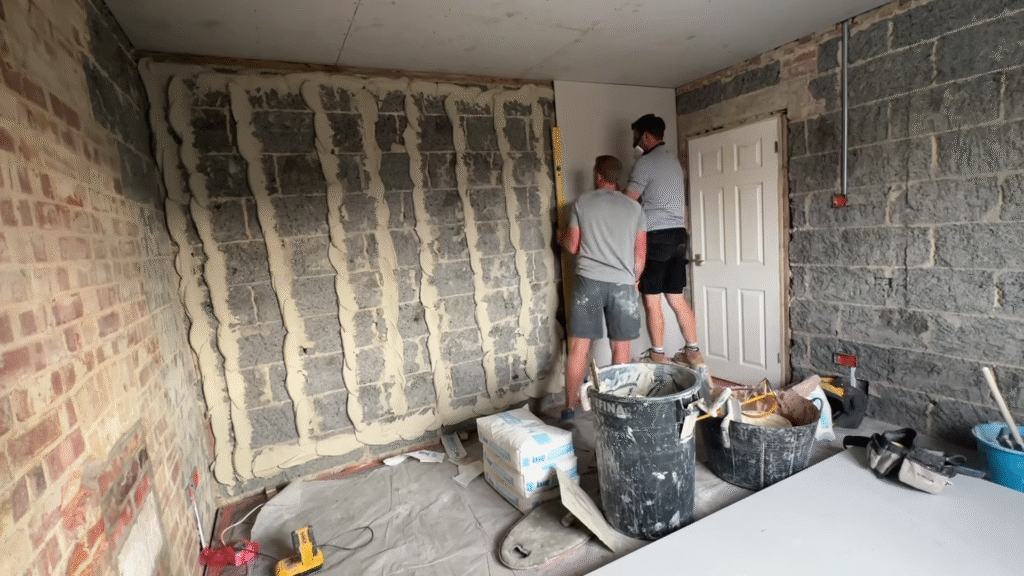
Phase 4: The Application Technique
There is a debate in the plastering world about “how much is enough” when it comes to adhesive. Manufacturers generally specify around 20% coverage, but experienced spreaders often use more.
The “Perimeter” Method
Do not just put random blobs in the middle of the wall. You should aim for a continuous ribbon of adhesive around the entire perimeter of where the board will sit.
- Top and Bottom: This supports the edges of the board.
- Sides: This seals the board against its neighbor.
- The Middle: Apply vertical columns of dabs down the center of the board area.
Why is the perimeter seal important?
- Fire Safety: It prevents fire from spreading up the gap cavity behind the board.
- Thermal Performance: It stops cold air from circulating behind the plasterboard, which creates a “chimney effect” that cools the room.
- Pest Control: It stops insects from navigating behind your walls.
Applying to the Wall vs. The Board
While you can apply adhesive to the board itself, applying it to the wall allows for easier pre-leveling. You can see the high and low spots of the brickwork and adjust the size of your dabs accordingly before the heavy board gets in the way.
Phase 5: Fixing and Leveling the Boards
This is where the skill comes in. Sticking the board to the wall is easy; getting it perfectly flat and plumb requires finesse.
Step-by-Step Installation
- Cut to Size: Measure your floor-to-ceiling height. Ideally, cut the board about 10-15mm shorter than the total height to allow for movement and lifting.
- Lift and Place: Press the board firmly against the dabs.
- Packers: Place packers (wedges) under the bottom edge of the board. Using a foot lifter or a pry bar, lever the board up tight against the ceiling. This ensures a snug fit at the top and keeps the board off the damp floor.
Pro Tip: We use a combination of standard plastic glazing packers and specific door packers to get the height exactly right.
The Art of Leveling
Once the board is on, grab your spirit level. You need a long level (1800mm or similar) for this.
- Vertical (Plumb): Check the board is standing straight up and down.
- Horizontal: Check across the width of the board.
- The “Cove Line” and “Skirting Line”: This is a detail often missed by amateurs. Run your level along the very top (where coving might go) and the very bottom (where skirting boards will go). These areas must be dead flat. If the bottom of the wall waves in and out, the carpenter who fits the skirting boards later will have a nightmare trying to fill the gaps.
Use a straight edge or the level to tap the board back into the adhesive. If a spot is too low, you might need to pull the board off slightly to break the suction and pull the adhesive out, or add more dabs.
Why We Use More Adhesive
You might notice we use a generous amount of adhesive—more than the minimum spec.
- Easier Leveling: A thicker bed of adhesive gives you more “play.” You can tap the board back 10mm or 20mm to accommodate a bulge in the brickwork. If the dabs are too thin, you hit the brick immediately and can’t adjust the board.
- Solid Feel: A wall with 40-50% adhesive coverage feels solid when you knock on it. A wall with the bare minimum can feel hollow and drummy.
Phase 6: Finishing Touches
Once all the boards are up, check your joints. They should be tight and flush. If you have any large gaps, fill them with offcuts or adhesive.
The walls are now ready for the next stage. In a full renovation, this would typically involve:
- Taping: Applying scrim tape (fiberglass mesh) to all the joints.
- Beading: Installing corner beads on external angles.
- Skimming: Applying a 2-3mm coat of Multi-Finish plaster to create that smooth, paintable surface.
Conclusion
Dot and dab is a fantastic system for renovating old masonry properties. It bridges the gap between the chaotic, uneven nature of old brickwork and the clean, precise lines of modern living.
While it is physically demanding work, the principles are straightforward. Prepare your surface, be generous with your mixing and application, and obsess over your levels. If you get the boarding right, the plastering that follows will be a breeze.
If you are tackling a renovation, don’t rush the prep. A well-primed wall and a level board are the secrets to a professional finish that lasts a lifetime.
Have you tried dot and dab plastering? Let us know your experiences or questions in the comments below!


