Get 10% descount on first project
Stripping Back Damaged Render & Prepping for 100mm External Wall Insulation: Full Professional Guide
Introduction
There is nothing quite as daunting—or as rewarding—as a full-scale exterior renovation. When a property is suffering from penetrating damp, mold, and poor thermal efficiency, a simple lick of paint won’t suffice. The solution often requires stripping the building back to its bare bones and wrapping it in a protective, thermally efficient blanket.
In this comprehensive guide, we are taking a deep dive into a major renovation project on a semi-detached property. The mission? To strip away old, failing render from three sides of the house and install a high-performance 100mm External Wall Insulation (EWI) system.
This isn’t just about aesthetics; it is about livability. The homeowner has been battling horrible mold and cold conditions, a common plight in older housing stock. By the end of this process, the house won’t just look brand new—it will be watertight, “toasty” warm, and future-proofed against the elements.
Below, we break down the entire process, from the brutal work of demolition to the precision of cutting EPS insulation boards with advanced tools.
Phase 1: Site Setup and Protection
Before a single hammer is swung, the site must be secured and prepared. Demolition is an inherently messy and aggressive process, and without adequate protection, you risk damaging expensive glazing or surrounding hardscaping.
Window and Ground Protection
The first level of protection involves shielding the windows. When render is hacked off, debris flies at high velocity. We utilize plywood or Correx sheets over the windows. This acts as a sacrificial barrier, ensuring that a stray chunk of concrete doesn’t result in a shattered pane.
Furthermore, the ground needs protection. Old render is heavy and sharp. Dropping it directly onto a patio or driveway can chip stones and crack paving. Laying down heavy-duty sheets or boards allows for easier cleanup and protects the client’s property.
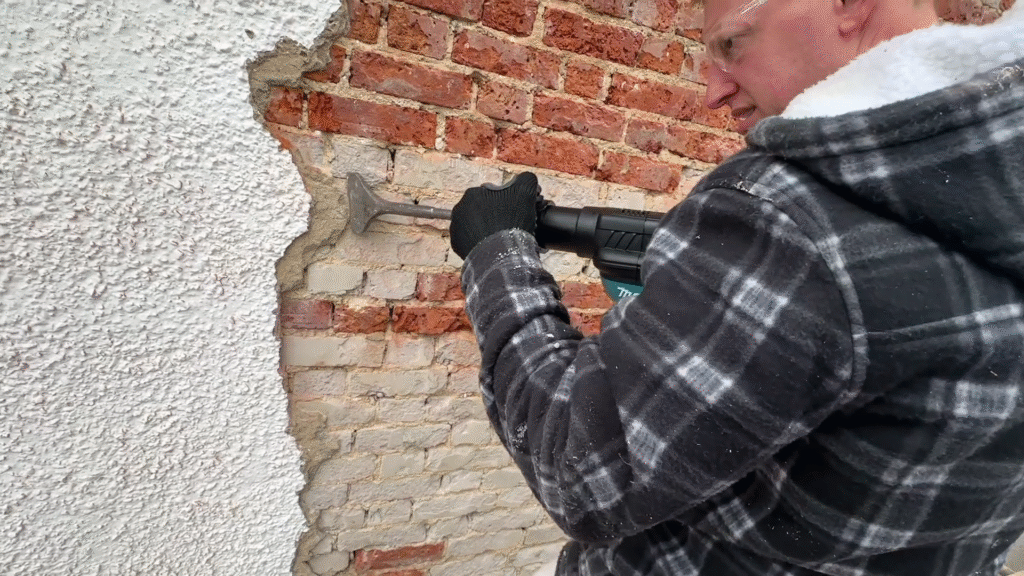
Phase 2: The Demolition (Stripping the Render)
Removing old render is deceptive. To the untrained eye, it looks like simple brute force work. However, it requires a balance of power and technique to remove the coating without destroying the brickwork beneath.
Assessing the Render
On this particular project, the existing render was in very poor condition. While it was crumbling in places, removing it was still a significant challenge. Bad render doesn’t always fall off in large, satisfying sheets; often, it comes away in awkward, unpleasant little chunks, making the process time-consuming and labor-intensive.
Choosing the Right Tools
You cannot rely on a standard household drill for this. The job requires heavy-duty demolition hammers.
- The “Big Boy” Breakers: We utilized a 7kg hammer drill with a chisel bit. This tool provides the necessary impact energy (measured in Joules) to break the bond between the render and the brick.
- The Lightweight Option: We also had a Milwaukee cordless breaker on site. While excellent for mobility and lighter tasks, it eats through batteries rapidly and lacks the sheer “kick” of the heavier, corded breakers.
Pro Tip on Chisel Heads: Size matters when selecting a chisel bit. We initially tested a 6-inch chisel head, but for stubborn render, it dispersed the impact energy too much. Switching to a 4-inch chisel head concentrated the force, allowing the tool to bite into the material more effectively.
Safety and Cleanup
The noise generated by these machines is akin to a jet engine; ear protection is non-negotiable. Additionally, the dust is immense. We ensure a skip is on-site (or en route) to manage the mountains of rubble generated. A clean site is a safe site, so regular sweeping and bagging of debris is part of the workflow.
Phase 3: Substrate Preparation
Once the heavy demolition is finished, you are left with a dusty, scarred brick wall. You cannot simply stick insulation to this surface. It needs to be stabilized.
Brushing and Cleaning
The first step is a thorough brush down using a stiff, long-handled brush. This removes loose sand, dust, and remaining debris. In some cases, a light hose down helps to settle the dust, but the wall must be dry before applying chemicals.
The Importance of Priming
This is a step that many amateur renovators skip, leading to catastrophic failure later. We applied a strong, universal primer (identifiable by its red color) to the entire surface area.
Why is this crucial?
- Dust Consolidation: The primer locks in any remaining fine dust that brushing missed.
- Suction Control: Old bricks can be very porous. Without primer, the brickwork might suck the moisture out of the adhesive too quickly, preventing a strong bond.
- Adhesion: It provides a sticky, keyed surface for the adhesive or render to grab onto.
If you skip this step, you risk the insulation boards “popping” off the wall because the glue adhered to a layer of dust rather than the structure itself.
Phase 4: Installing the Starter Track
With the wall prepped, we move to setting the baseline for the insulation. This is done using a “Starter Track” or base rail.
Creating a Damp Proof Zone
We installed a decorative plinth around the perimeter of the property. Crucially, we extended the existing damp proof course (DPC).
Where the starter track runs along the wall, we applied a thick, continuous bead of waterproof silicone sealant behind it. This ensures that no moisture can track up behind the insulation. The starter track acts as a shelf for the 100mm insulation boards to sit on, ensuring they are level and supported.
This system guarantees that the insulation starts above the ground level, preventing capillary action (rising damp) from soaking into the insulation material.
Phase 5: Working with EPS Insulation
The core of this renovation is the installation of 100mm Expanded Polystyrene (EPS) boards. This material is lightweight, easy to handle, and offers excellent thermal retention.
The “Hot Knife” Technique
Cutting EPS insulation can be a nightmare if you use a standard wood saw. The friction creates static-charged polystyrene “snow” that sticks to everything and ruins the local ecosystem.
To combat this, we utilize a specialized Hot Knife Cutter.
- How it works: The blade heats up to approximately 600°C in seconds.
- The Technique: You mark your line, and then let the heat do the work. You glide the knife through the foam like butter. Do not force it, or you risk distorting the blade.
- The Benefits: It creates a perfectly sealed, smooth edge with zero dust and zero mess. It allows for precision cuts around windows, pipes, and corners that would be impossible with a saw.
Managing Obstructions
On retrofit projects, you often have to work around existing infrastructure. In this case, we had downpipes and soil stacks that couldn’t be removed. This required precise measuring and cutting of the insulation blocks to “notch” them around the pipes, ensuring the thermal envelope remained as continuous as possible.
Phase 6: Adhesive Application and Fixing
The final step in this phase is adhering the boards to the wall. We use a specific cement-based adhesive designed for EPS systems.
Mixing the “Gear”
We mix the adhesive in large 110-liter tubs. For efficiency, we use a render pump machine to mix and dispense the adhesive. This speeds up the process significantly compared to mixing bag-by-bag with a hand whisk.
The Application Method
There are strict industry standards for applying adhesive to EWI boards. You cannot simply put a “blob” in the middle.
- Percentage Coverage: We aim for at least 40% surface area coverage on the back of the board.
- Perimeter Bead: Ideally, a ribbon of adhesive should go around the perimeter of the board to prevent air circulation behind the insulation (which creates a chimney effect in a fire and reduces thermal performance).
- Pressure: The boards are pressed firmly against the primed brickwork, checking for level and plumb as we go.
By using a pump to spray the glue, we reduce waste and ensure a consistent mix ratio, making the job faster and the bond stronger.
Conclusion
Transforming a cold, damp, semi-detached house into a warm, modern home is a massive undertaking, but the results are immediate. By stripping back the failing render and installing a high-quality 100mm EWI system, we have not only solved the homeowner’s damp issues but also drastically reduced their future energy bills.
The key takeaways from this stage of the build are clear: proper preparation is everything. From the heavy demolition to the delicate priming and the precision of the hot knife, every step builds the foundation for the next.
In the next stage of this project, we will look at the mechanical fixings (adding dowels for extra security) and the application of the final render coat that will give the house its brand-new look.
Are you considering External Wall Insulation for your property? It’s a big investment, but one that pays dividends in comfort and structural integrity. Stay tuned for more updates on this project!


