Get 10% descount on first project
Learn the complete process of microcement priming, mesh installation, and applying the base coat for a durable, waterproof finish.
Introduction
Microcement has become one of the most popular modern finishing materials for bathrooms, wet rooms, and high-moisture areas. Its durability, sleek appearance, and waterproof properties make it an excellent choice for homeowners seeking long-term solutions to peeling paint, condensation issues, and dated interiors. While the final look of microcement may appear smooth and minimalistic, the preparation work behind the scenes is what ensures a flawless, long-lasting finish.
In this blog, we’ll walk through a detailed, professional step-by-step guide on how to apply microcement primer, install mesh, and complete the very first base coat. This guide is inspired by a real on-site microcement installation from Daniel Lee Plastering and Rendering, transforming a moisture-prone en-suite bathroom into a beautifully modern, waterproof space.
Whether you’re a DIY enthusiast eager to learn proper techniques or a professional looking to refine your skills, this in-depth guide will give you the knowledge you need to get the job done with confidence.
Preparing the Surface for Microcement
Why Proper Preparation Matters
Microcement is a thin yet highly durable material. Because of its minimal thickness, the condition of the underlying surface determines the final result. Uneven surfaces, loose paint, flaking plaster, or moisture issues will all show through if not corrected beforehand.
In the case of the en-suite bathroom shown in the video, condensation had caused paint to peel and moisture to collect on the walls. Instead of repainting and facing the same problem again, the homeowners opted for microcement—a superior long-term solution.
Requirements for a Suitable Surface
Before applying microcement:
- The walls must be fully plastered and dry.
- Plasterboard alone is not suitable. Microcement requires a solid, prepared surface.
- The substrate should be clean, smooth, and free from dust, oils, or loose materials.
Once the walls are fully prepared, the next step is protection.
Protecting the Surrounding Area
Before starting any microcement process:
- Cover floors, tiles, and fixtures.
- Use protective sheets and masking tape.
- Remove or protect accessories such as towel holders, switches, or mirrors.
Microcement is thin but extremely sticky, especially once the primer is applied, so proper protection saves time and prevents accidental marking.
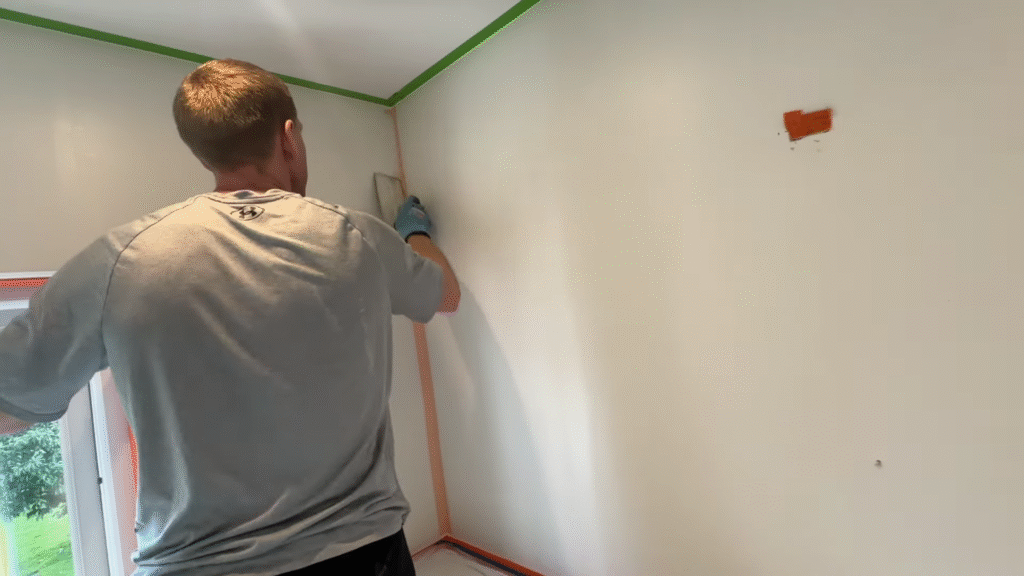
Cutting and Installing the Reinforcement Mesh
Why Mesh Is Essential
Microcement systems rely on reinforcement mesh to:
- Add strength and flexibility
- Prevent cracking
- Improve bonding
- Create a consistent base for the coatings
The mesh works hand-in-hand with the primer to ensure a stable foundation.
Cutting the Mesh Correctly
Because microcement is applied in thin layers, mesh should never be overlapped, or you risk visible ridges in the final finish.
Professional tips:
- Cut mesh from floor to ceiling to avoid overlaps.
- Use sharp scissors, not a Stanley knife.
- Scissors prevent snagging.
- Less fraying and cleaner edges.
Pre-cut all pieces before rolling on the primer to speed up the workflow.
Applying Microcement Primer
Choosing the Right Primer
The video uses a waterproof wet room microcement primer, ideal for bathrooms and moisture-heavy environments. Primers vary by brand and finish type—always choose the primer that matches your microcement system.
Tools You Need
- Microfiber roller (9-inch recommended)
- Roller tray (clean)
- 2-inch brush for edges and corners
- Clean bucket or container
Microfiber rollers provide the smoothest application and ensure consistent absorption.
Primer Application Process
- Pour the premixed primer into the tray.
- Load your roller evenly.
- Apply the primer smoothly across the entire wall.
- While the primer is still wet, press the mesh into place.
- Use the roller to gently embed the mesh, ensuring:
- No bubbles
- No folds
- Full adhesion
The beauty of this particular primer is that it glues the mesh to the wall while also priming the surface, making the process fast and efficient.
Don’t Forget Your Edges
Use your 2-inch brush to:
- Cut into corners
- Prime edges
- Ensure complete wall coverage
Some installers also use plaster scrim tape for tighter corners, depending on the complexity of the room.
Mixing and Preparing the First Base Coat
About the Base Coat
The first base coat is the foundation layer that:
- Covers the mesh
- Levels the surface
- Prepares the wall for the second base coat and the final color coats
The product shown in the video is pre-mixed and packaged in a bag, ready for immediate use.
How Much Does One Bag Cover?
The manufacturer states 10 m², but in practice, professional installers often achieve 10–15 m², depending on the smoothness of the surface and the precision of the application.
Mixing the Base Coat
- Squeeze the pre-mixed product bag to soften and loosen the material.
- Cut open the bag and pour it into a clean container.
- Stir if necessary to ensure consistency.
Always start with clean buckets and tools—microcement shows every imperfection.
Applying the First Base Coat
Tools Required
- Spatula
- Flexible trowel
- Microfiber cloth or sponge for cleaning tools
Because microcement is extremely thin, you do not need a hawk. In fact, the spatula often replaces the traditional hawk due to how easily the material spreads.
Application Technique
Key Goal: Thin and Flat
The first base coat must be applied:
- Thinner than the mesh thickness
- Perfectly flat
This foundational layer determines how smooth your final finish will be.
Step-by-Step
- Scoop a small amount of material onto your spatula.
- Apply it to the wall using long, smooth passes with your trowel.
- Work in manageable sections.
- Keep constant pressure to maintain thinness.
- Clean your tools frequently to avoid drag lines.
Avoiding Imperfections
A few important points:
- The flatter you apply the first coat, the fewer lines you’ll need to sand later.
- Trail lines left during this stage often reappear even after sanding, so precision matters.
- Over-application results in uneven layers and wasted material.
Cleaning Tools as You Work
Microcement dries quickly on tools. To prevent build-up:
- Keep a bucket of clean water nearby.
- Use a microfiber cloth or sponge for wiping.
- Avoid old paintbrushes—they leave streaks.
The Finished First Coat
After applying the base coat, the wall should:
- Look uniformly covered
- Feel smooth with subtle texture
- Show no deep trowel marks
- Be ready for the second base coat once fully dry
This first coat creates the foundation for the remaining layers, which include:
- Second base coat
- Color coat(s)
- Sealers, varnish, and hardeners
These additional stages provide the waterproofing, the final aesthetic, and the durability microcement is known for.
Conclusion
Microcement installation is a detailed process that rewards patience, precision, and proper technique. From priming the walls and embedding mesh to applying that all-important first base coat, each step plays a crucial role in the final look and longevity of your microcement surface.
If you’re planning a bathroom renovation or searching for a modern, moisture-resistant wall finish, microcement is an outstanding choice. With the right tools, preparation, and method, you can achieve a stunning, professional result.
If you found this guide helpful, feel free to explore more tutorials, share your thoughts in the comments, or continue learning about advanced microcement techniques.


