Get 10% descount on first project
The Complete Guide to Applying a Lime Render Top Coat (Pro Finish Tips)
The Complete Guide to Applying a Lime Render Top Coat (Pro Finish Tips)
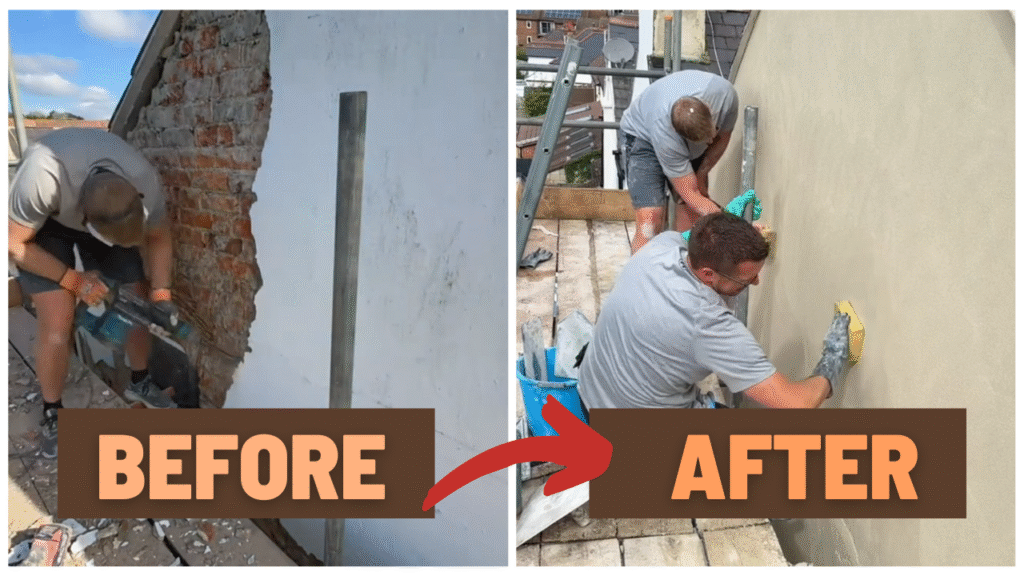
Lime render has been used for centuries, not just for its durability but for its incredible breathability and natural finish. Whether you’re renovating an old property or applying a fresh top coat to modern external walls, mastering lime render is essential for achieving a long-lasting, beautiful result.
In this comprehensive guide, we break down every step demonstrated in the video transcript — from prepping the wall to applying mesh, mixing lime, floating, sponging, and finishing. But we don’t stop there. You’ll also learn professional insights, practical troubleshooting tips, and best practices that ensure your lime render cures properly and looks flawless.
If you’re aiming for a perfect top coat finish, this guide will walk you through the process with clarity and confidence.
Understanding Lime Render: Why It Matters
Before jumping into the hands-on steps, it’s important to understand why lime render is such a valuable material.
Why Use Lime Render?
- Breathability: Lime allows moisture to escape, preventing trapped dampness.
- Flexibility: Less prone to cracking than cement-based render.
- Eco-friendly: Lower carbon footprint and more natural.
- Ideal for older buildings: Works perfectly with timber and historic masonry.
However, because lime render is breathable, it must be applied correctly to avoid future issues — especially with moisture, cracking, and adhesion.
Step 1: Inspecting and Preparing the Wall
The process begins with a careful inspection of the wall.
In the transcript, the plasterer checks the sections of the wall that are:
- Sheltered and in good condition, and
- Exposed to weather, especially corners that tend to deteriorate faster.
Cutting Control Lines
Control lines are used to prevent excessive damage when removing previous render.
A clean vertical cut ensures:
- You don’t accidentally remove more render than needed.
- The new top coat blends smoothly into the existing sections.
Step 2: Filling Deep Gaps and Hollow Areas
Large holes, especially around windows, must be filled before applying the top coat.
Why You Should NOT Fill Large Gaps with Lime Render
Lime render is breathable. If you use it to fill deep cavities around windows or wood, the moisture will travel into the timber and cause rot.
Best Solution: Expanding Foam
A roofing and insulation expanding foam is recommended because:
- It’s waterproof
- Has high thermal performance
- Adheres well to awkward gaps
- Ensures no moisture travels into timber frames
The transcript also mentions cutting back dried foam using an old trowel, never the good one. This is crucial: a sharp edge is needed for trimming, but never use your best tools for this rough prep work.
Step 3: Soaking the Wall (Very Important)
Lime render is extremely porous. This means the substrate can suck moisture out of the new coat, causing it to dry too fast.
Why Soak the Wall?
- Slows down drying time
- Prevents cracking
- Helps the new render bond properly
Even though it had rained during the day, the plasterer still thoroughly soaked the wall again. This is standard practice when dealing with lime.
Step 4: Cutting and Fixing Reinforcement Mesh
Reinforcement mesh strengthens the render and helps prevent cracking.
Benefits of Using Mesh
- Distributes stress evenly
- Reduces hairline cracks
- Adds stability on corners and exposed areas
This step is especially important on:
- Old walls
- Uneven masonry
- Areas with past cracking issues
The mesh is cut to size using scissors and fixed in place before or during the first pass of the top coat.
Step 5: Mixing Lime Render Correctly
The mixing stage is often where many DIY jobs go wrong. Lime render must be mixed to the correct consistency.
Key Mixing Details from the Transcript
- The team mixes 4 to 5 bags at a time.
- Consistency is described as slightly sloppy, but thickness can vary depending on weather.
- They use a DeWalt cordless mixing drill, noting that each battery only supports about two full mixes.
Pro Mixing Tips
- Add water gradually to avoid over-thinning.
- Mix longer than you would with cement — lime benefits from longer mixing times.
- In humid or wet weather, keep the mix slightly thicker.
Step 6: Applying the Top Coat
Now comes the hands-on part of the job.
How to Apply Lime Render Properly
- Use a hawk and trowel to load the render.
- Press firmly into the wall, especially over the mesh.
- Work systematically across the wall.
- Ensure even coverage before moving to float work.
The transcript shows two people working together, which speeds up the workflow and ensures consistent coverage.
Things to Watch Out For
- Hollows (small dips in the surface) should be filled early.
- Avoid working with render that’s too dry.
- Keep tools damp to stop sticking.
Step 7: Getting the First Float Coat Done
After roughly 1 to 1.5 hours, depending on weather, the plasterer goes over the render with a power float.
Purpose of Power Floating
- Levels the surface
- Reveals hollows that need filling
- Smooths down high spots
On damp days, the render remains workable for longer, which is beneficial for achieving a clean finish.
After power floating, the team fills all visible hollows with remaining render.
Step 8: Fine Finishing with a Plastic Float
Once the main float is complete, a plastic float is used for precision.
What the Plastic Float Does
- Smooths edges
- Blends joints
- Reduces trowel lines
- Prepares the surface for final texture
This step is essential for achieving a seamless, polished look.
Step 9: Final Sponge Finish
A damp sponge is used as the final stage to create an even finish.
Why Sponging Matters
- Softens any remaining marks
- Gives the render a natural texture
- Helps prepare the wall for breathable lime paint
The sponge must be damp — not soaking — and the amount of water depends on the wall’s moisture level.
Important Warning
Lime corrodes skin. Gloves should always be worn.
Step 10: Painting Lime Render
Once fully cured, usually after several days or weeks depending on weather, the wall must be painted with a breathable paint.
Suitable Paint Types
- Limewash
- Specialist lime paint
- Breathable silicone paints approved for lime render
Using non-breathable paint will trap moisture and ruin the entire purpose of lime render.
Final Thoughts
The top section of the wall in the video was completed with a flawless lime render finish. Through proper preparation, careful mixing, reinforcement, and expert finishing techniques, you can achieve the same high-quality results.
Lime render requires patience, the right materials, and attention to moisture control — but when done properly, it creates a durable, beautiful finish that lets your walls breathe naturally.
Conclusion
Applying a lime render top coat is both an art and a craft. With the right preparation, tools, and techniques, you can achieve a long-lasting, breathable, and professional finish on any exterior wall.
If you found this guide helpful, feel free to explore more topics on plastering, rendering, and exterior wall finishes. Don’t forget to share your thoughts or questions — your feedback helps inspire more expert guides like this one!


