Get 10% descount on first project
Silicone Render Failure: How to Fix It the Right Way
Introduction
Silicone render is a popular choice for modern homes due to its durability, flexibility, and weather resistance. However, even the best render can fail if not applied correctly or if underlying structural issues arise. When cracks, water damage, or discoloration appear, it’s a clear sign that action is needed before things get worse.
In this blog, we’ll walk you through a real-life case of silicone render failure around a window box, why it happened, and how it was professionally repaired. If you’re a homeowner, contractor, or DIY enthusiast, this guide will help you understand the right approach to fixing and preventing render issues.
Why Does Silicone Render Fail?
Silicone render can last for years, but when it starts showing signs of damage, the causes can vary. Here are the most common reasons:
1. Poor Installation
- Incorrect application or insufficient curing time
- Inadequate primer or bonding agent
- Failure to follow manufacturer guidelines
2. Structural Issues
- Movement in the underlying substrate (e.g., timber frame shifting)
- Poorly installed cement boards
- Lack of waterproofing, leading to moisture buildup
3. Weather & Environmental Damage
- UV exposure causing color fading and material breakdown
- Freeze-thaw cycles leading to cracks and delamination
- Excessive rain leading to trapped moisture behind the render
The Repair Process: Step-by-Step Breakdown
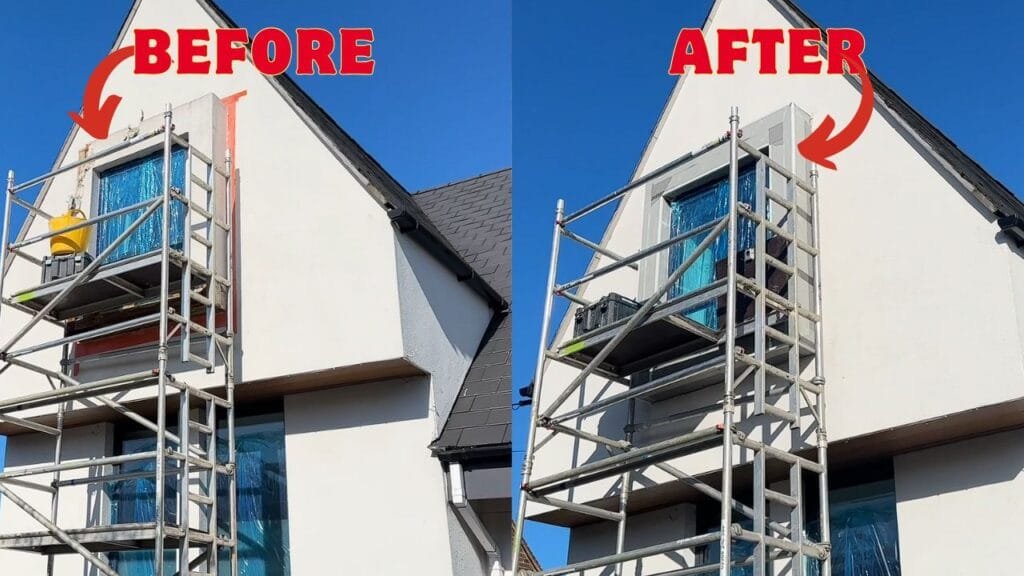
In this case study, the main issue was a failing thin-coat silicone render system around a window box on a 10-year-old property. The render was cracked, discolored, and separating from the substrate, and on further inspection, water damage and rotting timber were discovered.
Step 1: Removing the Damaged Render & Inspecting the Structure
The first step was to completely strip the failing render to expose the cement board underneath. Once removed, the water damage was severe, with damp timber and pooling water causing structural weakness.
Step 2: Replacing Rotten Timber & Strengthening the Frame
- Removed all rotten wood and replaced it with new treated timber
- Applied wood hardener and wet rot treatment to reinforce surrounding timbers
- Allowed sufficient drying time before proceeding to the next steps
Step 3: Installing New Cement Boards
To create a strong foundation for the new render system:
- New cement boards were cut and fitted precisely around the window box
- Waterproof sealant was applied generously to all edges and joints
- Ensured a weather-tight fit to prevent future moisture penetration
Step 4: Applying the Silicone Render System
Once the base was secure, the thin-coat silicone render system was applied:
- Basecoat Application – A reinforcing basecoat with embedded mesh for strength
- Primer Layer – Enhances adhesion and color consistency
- Final Silicone Render Coat – Color-matched to the original render as closely as possible
Step 5: Addressing Color Matching Issues
Even with an exact color match, sun exposure and weathering over time can cause noticeable differences between the old and new render. To minimize this:
- The homeowner was advised to apply a silicone-based paint over the entire surface
- This ensures uniform color and long-term durability
Tips to Prevent Silicone Render Failure
To ensure your render stays in top condition for years, follow these best practices:
✔️ Hire a Professional: Proper installation is key to avoiding costly repairs later. ✔️ Check for Structural Integrity: Ensure the substrate is stable before applying render. ✔️ Invest in Waterproofing: Use high-quality sealants and primers to prevent moisture damage. ✔️ Perform Regular Inspections: Look for early signs of cracking or dampness and address them promptly. ✔️ Consider Protective Coatings: A silicone-based paint can extend the life of your render and maintain its appearance.
Final Thoughts
Silicone render is an excellent choice for homes, but like any exterior finish, it requires proper installation and maintenance. If you spot cracks, discoloration, or dampness, don’t ignore them—early intervention can save you thousands in repairs.


Watched your informative video on render repair. We have come across many failures of the type you describe – use of moisture permeable external tapes such as extoseal can assist at windows but critical and not mentioned is the necessity to ventilate the timber as condensation alone will rot it. Best to weather the top surface with an appropriate flashing as render is not designed to resist standing water – keep up the great work!