Get 10% descount on first project
A Step‑By‑Step Guide to Plasterboarding a Ceiling
Introduction
Plasterboarding a ceiling is one of the most important stages in creating smooth, professional, and long‑lasting interior finishes. Whether you’re renovating a room, preparing a space for plastering, or building a brand‑new ceiling, understanding the correct methods, tools, and techniques makes all the difference. In this detailed guide, based on hands‑on, real‑site experience, we walk through the full plasterboarding process—from choosing your starting point to cutting, scribing, screwing, and avoiding common mistakes.
This step‑by‑step breakdown is designed to give you expert‑level insight, even if you’re relatively new to the trade. By the end of this blog, you’ll know exactly how to set out your boards, how to use essential tools, how to achieve perfect symmetry, and how to ensure long‑term durability.
A Step‑By‑Step Guide to Plasterboarding a Ceiling
Finding the Perfect Starting Corner
One of the most overlooked parts of plasterboarding is choosing the correct starting point. A wonky corner or poorly aligned board can cause issues through the entire ceiling.
Before fixing anything:
- Look for the most square corner in the room.
- Inspect all corners—walls may look straight but still be slightly off.
- Choose the corner where the board will sit tight and square.
In the example job, the installer chose the most reliable corner against the original wall—not the newly added angled areas. This ensures that every board laid afterwards stays aligned.
Running the Boards Correctly
The boards used were 2.4 m long by 1.2 m wide, and they were run opposite to the direction of the new joists/battens. This is crucial because:
- It maximizes strength.
- It prevents unnecessary sagging.
- It ensures proper fixing points.
So, always run boards perpendicular to the joists for best results.
Essential Tools and How to Use Them
The Auto‑Feed Screw Gun
A highlight of this job is the demonstration of an auto‑feed screw gun, similar to those from Festool or DeWalt.
Benefits of an auto‑feed gun:
- Significantly speeds up installation.
- Perfect for ceilings where you need one hand free to support the board.
- Ensures screws drive consistently.
Assembling the gun requires lining up the main body and the head properly without forcing it. Once assembled, it becomes an incredibly efficient tool for large plasterboarding projects.
The Importance of a Sharp Blade
A standard Stanley knife (even a budget model) is essential. A sharp blade makes cleaner cuts, prevents ragged edges, and reduces the effort required.
You should:
- Start each day with a new blade.
- Keep spare blades stored in the handle.
- Always cut long, consistent lines.
A blunt blade slows you down and tears the board rather than slicing it.
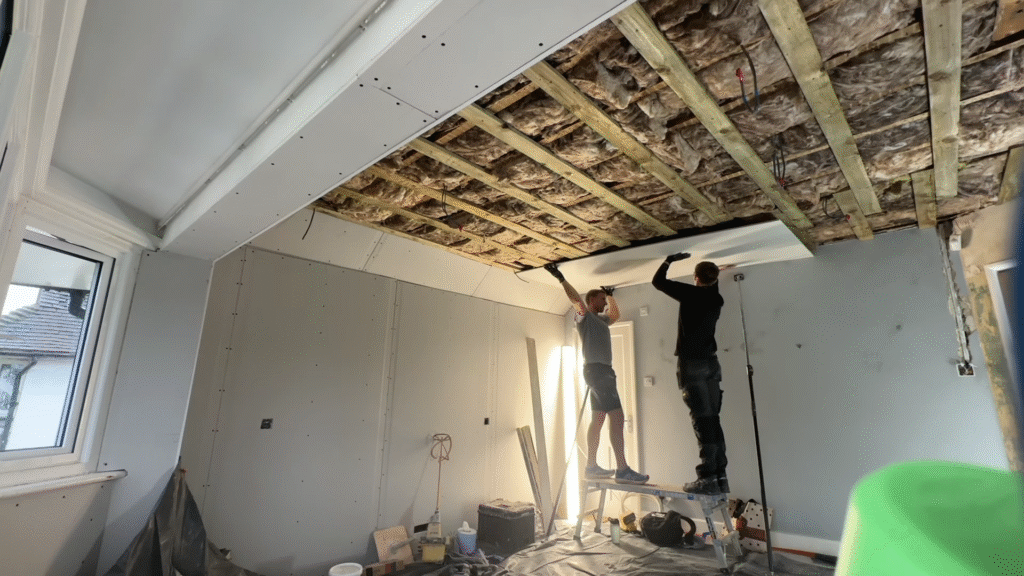
Step‑By‑Step: Fixing and Holding the Boards
Working with a partner makes ceiling plasterboarding much easier. Here’s the general process used:
- Lift the board into position.
- One person holds the board flush to the joists.
- The second person slides the board into place to ensure tight edges.
- Once positioned, the first screws are driven into the edges to secure it.
A firm push towards the wall helps close any gaps.
Scribing for a Tight Fit
Not all ceilings are perfectly level or square. That’s where scribing becomes essential.
In the example, the installer noticed:
- A 2‑inch gap at one end
- A perfectly tight spot in the middle
- A 1‑inch gap at the opposite end
By scribing the board, he created a custom‑fit edge that matched the wall perfectly.
How to Scribe a Plasterboard
- Hold the board in the final position.
- Use a pencil or marker to trace the shape of the wall.
- Cut along the marked line.
- Fit the board back up—the result is a snug, professional finish.
This ensures:
- Perfect alignment
- No large gaps
- Smooth flow for the rest of the ceiling boards
Creating Symmetry in the Ceiling Layout
A good ceiling not only performs well but also looks symmetrical. Small details make a big impact.
The method used here:
- Install the full‑length board first.
- Work outwards using that as the reference.
- Avoid starting with a short board if a long one defines the full run.
This ensures joints line up correctly and avoids awkward small offcuts.
Cutting Out for Lights and Wires
Cutting holes for downlights, wires, or switches is simple when done correctly.
Recommended Method:
- Mark the center point of the light or cable.
- Use a Stanley knife to cut a clean opening.
- Test the fit.
Even without power tools, a knife works very well for single cables or small holes.
Positioning and Fixing Boards Securely
Once the boards are up, securing them properly is essential.
How Many Screws Do You Need?
For 1.2 m wide plasterboards, the recommended screw pattern is:
- One screw at each end
- One in the middle
- Two additional screws evenly spaced
That gives around 7 screws per 1.2 m section.
In the demonstration, the screws were lined up cleanly and driven into the joists in a straight row—this not only looks neat but ensures maximum strength.
Avoid Over‑Screwing
Over‑screwing is a very common problem.
If you drive the screw too deep and rip through the paper:
- The board loses up to 50% strength at that fixing point.
- You must add another screw next to it.
You should also:
- Add fibre tape over any damaged areas.
- Double‑check surface integrity before skim‑coating.
Avoiding Common Plasterboarding Mistakes
1. Choosing the Wrong Starting Point
Starting from a crooked corner throws off the entire ceiling.
2. Running Boards in the Wrong Direction
Boards should always run opposite to joists.
3. Over‑Screwing the Board
Damaging the paper weakens the entire installation.
4. Not Scribing Uneven Walls
Skipping scribing leads to unsightly gaps that are difficult to hide.
5. Inconsistent Screw Spacing
Uneven spacing compromises the strength and finish.
6. Using Blunt Tools
A dull knife slows you down and gives poor results.
Final Checks Before Plastering
Before moving on to skim‑coating, make sure you:
- Inspect every screw for over‑driving.
- Check that all joints are tight.
- Ensure all cut‑outs are correctly placed.
- Verify symmetry across the ceiling.
- Apply scrim tape across all joints and corners.
A well‑plastered ceiling starts with a perfectly boarded one.
Conclusion
Plasterboarding a ceiling might seem challenging, but with the right tools, techniques, and a careful approach, even complex ceilings can be installed cleanly and efficiently. From selecting the best starting corner to scribing, cutting, and securing boards, every stage plays a role in the final finish.
If you’re working on your first ceiling or looking to refine your skills, these professional tips will help ensure your boards are straight, secure, and ready for a flawless skim.
Ready to learn more? Explore additional plastering and rendering guides, leave a comment, or share this article with someone starting a DIY project.


