Get 10% descount on first project
Learn the full process of applying a scratch coat with pro techniques, tools, and expert rendering tips
Applying a scratch coat is one of the most crucial steps in exterior rendering. It creates the foundation for a strong, durable, and long‑lasting finish. When done properly, the scratch coat ensures excellent adhesion, prevents cracking, and prepares the surface for the final top coat.
In this comprehensive guide, inspired by the on‑site process shown in the video, we walk you through the complete method of applying a professional scratch coat. Whether you’re a beginner, DIY enthusiast, or a renderer looking to refine your technique, this blog covers tools, materials, mixing ratios, mesh installation, bead preparation, scratch pattern tips, and expert techniques for a flawless finish.
Full Guide: How to Apply a Scratch Coat
Understanding the Wall Condition
Before applying any render, assessing the wall condition is essential. In the video, this garden wall was:
- Extremely damp
- Covered in vegetation
- Structurally weak in several areas
The wall had been stripped of old render months earlier and allowed adequate time to dry. This drying period is important for preventing moisture issues later.
A strong red universal primer was applied earlier to help bind dust, strengthen the surface, and improve adhesion.
Tools & Materials Used
To achieve a professional scratch coat, the following were used:
Tools
- Rendering trowels
- Hawk board
- Straight edge (6–7 ft recommended)
- Sharp utility knife or scissors
- Scratcher tool
- Buckets & sponges
- Dewalt mixing drill
- 110‑liter mixing tub
Materials
- White PVC angle beads (never galvanized for exterior work)
- Weber one‑coat render
- Render additive (improves flexibility & adhesion)
- 160g reinforcement mesh
- 5–6 liters of water per render bag
These tools and materials ensure proper adhesion, strength, and longevity.
Step‑by‑Step Application Process
1. Start by Preparing the Beads
White PVC beads were fixed in place. These are preferred because:
- They never rust
- They don’t corrode
- They’re easier to work with than stainless steel
Avoid galvanized beads completely — they will corrode outdoors.
2. Mixing the Render
Use Weber one‑coat render with approximately 5 to 6 liters of water per bag.
This mixture was prepared using:
- A large 110L mixing tub
- A powerful Dewalt mixing drill
Up to five bags were mixed at a time to keep the process continuous and efficient.
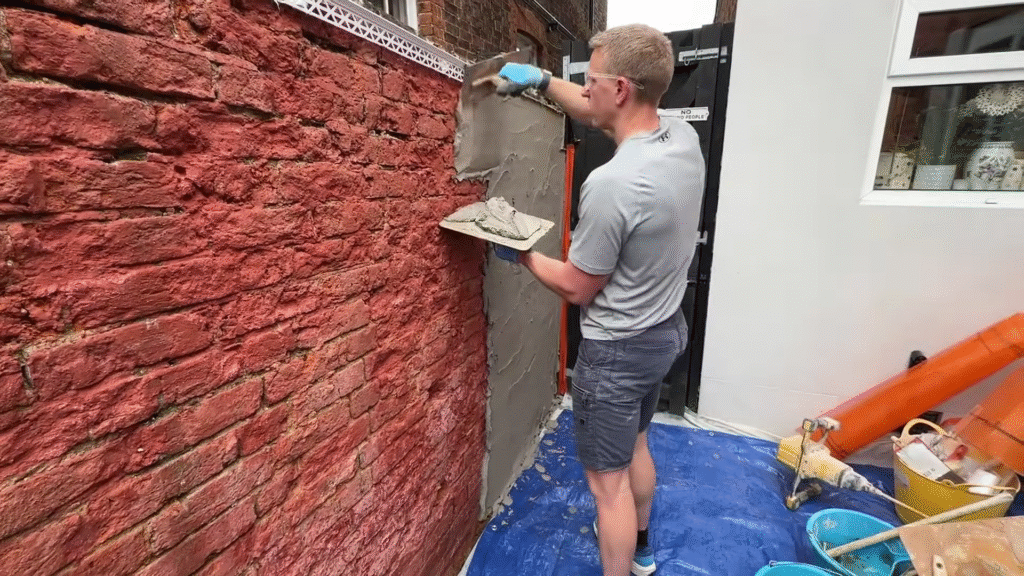
3. Applying the First Coat of Render
Start at the far right side if you’re right‑handed. This allows you to press render into render, reducing waste and improving adhesion.
Apply a generous base layer, especially if the wall:
- Is uneven
- Needs significant buildup
- Has deep hollows
Because this particular wall was in poor shape, a thick scratch coat was required to build it out and create a flat, level surface.
4. Ruling Off the Render
After applying render to a workable 6‑foot section:
- Use a long straight edge (6–7 ft)
- Pull it vertically and horizontally
- Create a flat, even surface
Ruling removes excess render and fills hollows for a uniform foundation.
5. Embedding Reinforcement Mesh
Reinforcement mesh is essential for strengthening the scratch coat and preventing cracks.
How to install it properly:
- Use 160g grade render mesh
- Press it gently into the fresh render by hand
- Roll over the surface first to flatten high spots
- Bed the mesh fully using a trowel
- Overlap each sheet by 100 mm (the mesh has black lines showing the overlap zone)
For awkward shapes or corners:
- Place the full mesh sheet first
- Use a knife or scissors to trim once it’s positioned on the wall
6. Applying the Second Layer Over the Mesh
Once the mesh is embedded, apply a thinner coat of render over it.
This layer:
- Covers the mesh fully
- Builds depth
- Ensures the render behind the beads measures 8–10 mm
This is still part of the scratch coat — the final coat will come later.
Scratching the Render for Maximum Key
Scratching is one of the most important steps.
Why scratch the render?
- It creates a mechanical key for the top coat
- Helps the next layer bond more effectively
- Reduces the risk of delamination
How to scratch correctly:
- Scratch horizontally only
- Use wavy lines, not straight lines
Why wavy lines?
Wavy or “wiggly” lines:
- Provide almost double the key compared to straight lines
- Give better grip and long‑term bond strength
Avoid vertical scratches — they do not offer proper keying.
Finishing Touches on the Scratch Coat
1. Cleaning the Beads
Once scratching is complete:
- Clean beads with your finger, sponge, or brush
- Remove any render build‑up
This ensures the next coat will sit correctly.
2. Tidying Floor Lines
Because this was a garden wall taken down to floor level, the bottom edge needed cleaning.
This involves:
- Scraping excess render from the floor line
- Smoothing transitions
- Maintaining a sharp outline
A clean bottom edge helps with waterproofing and aesthetics.
Final Result
The scratch coat is now complete and ready for the next stage. With reinforcement mesh, a thick consistent coat, and strong wavy scratches, the wall now has:
- Excellent structural support
- Maximum grip for the top coat
- A flat, even surface
- A long‑lasting base for exterior protection
Conclusion
Applying a scratch coat properly is essential for durability and a flawless final finish. From surface preparation to mesh installation and perfect scratch patterns, each step plays a critical role. With the right tools, good technique, and proper layering, you can achieve a professional‑level scratch coat that will stand the test of time.
If you found this guide useful, feel free to explore more rendering tips, ask questions, or dive into related tutorials on perfecting exterior plastering techniques.


