Get 10% descount on first project
Professional Plaster Repair: Water Damage & Render Failure Explained
Professional Plaster Repair: Water Damage & Render Failure Explained
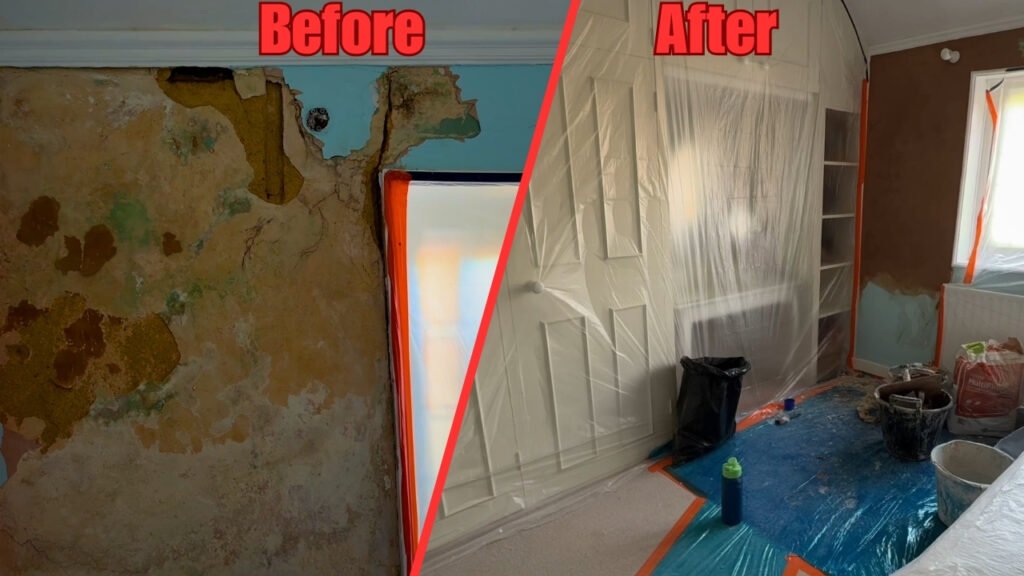
Plaster damage is one of the most common issues faced by homeowners, particularly in older properties or homes exposed to harsh weather. When water seeps through compromised render or external cracks, it can cause internal plaster to blister, crack, or even completely delaminate. In this guide, inspired by Daniel Lee Plastering and Rendering’s professional process, we break down how to effectively repair plaster damage caused by water ingress and render failure — ensuring your walls look flawless and remain protected for years to come.
Understanding the Cause: Why Plaster Fails
Before tackling any plaster repair project, it’s vital to understand why the damage occurred in the first place. In most cases, internal plaster problems stem from external dampness. Cracks in exterior rendering, blocked guttering, or damaged roof tiles can all allow water to seep through walls.
Common Causes of Plaster Damage:
- Cracked external render allowing moisture to penetrate
- Blocked gutters or downpipes directing water onto walls
- Roof leaks trickling down to interior surfaces
- Poor initial plastering or lack of stabilization
When water infiltrates through the render and reaches internal walls, it often causes delamination, where layers of plaster separate from the surface, leading to bulging, blistering paint, and powdery finishes.
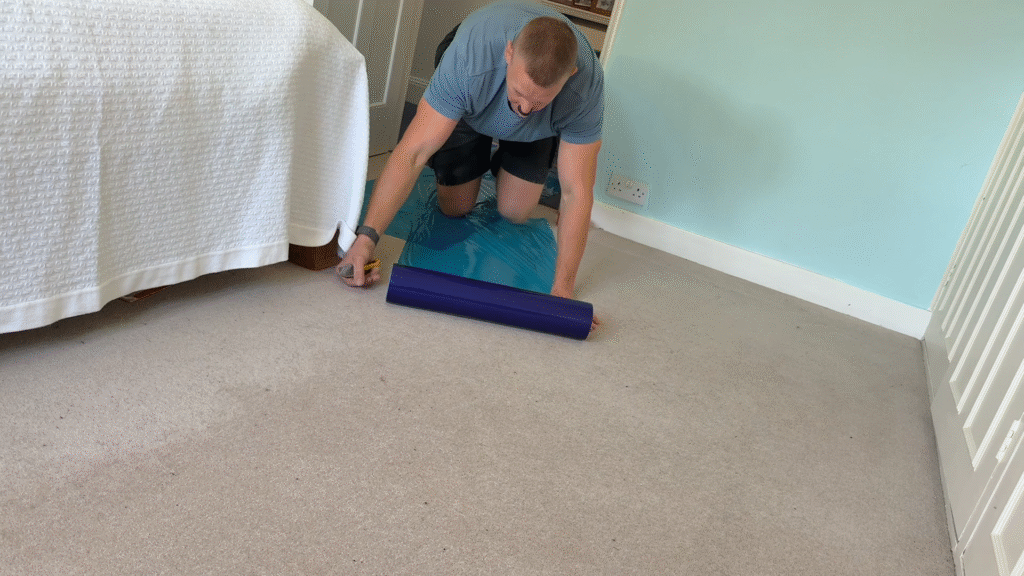
Step 1: Preparation and Protection
A professional plaster repair always begins with protecting the work area. Before any scraping or plastering begins, cover carpets, floors, and furniture.
Materials to Use:
- Carpet protector film: Low-tack, easy to remove, and suitable for most surfaces.
- Polythene drop sheets: Ideal for walls and furniture; available in multiple sizes.
- Masking or render tape: Essential for sealing off edges and preventing mess.
By fully protecting the workspace, you prevent dust and debris from spreading throughout the room and make cleanup faster and easier.
Step 2: Assessing and Removing Damaged Plaster
Once the area is secure, inspect the damaged wall carefully. Look for blistered paint, deep cracks, or loose plaster. Use a wallpaper scraper or spatula to remove any unstable material.
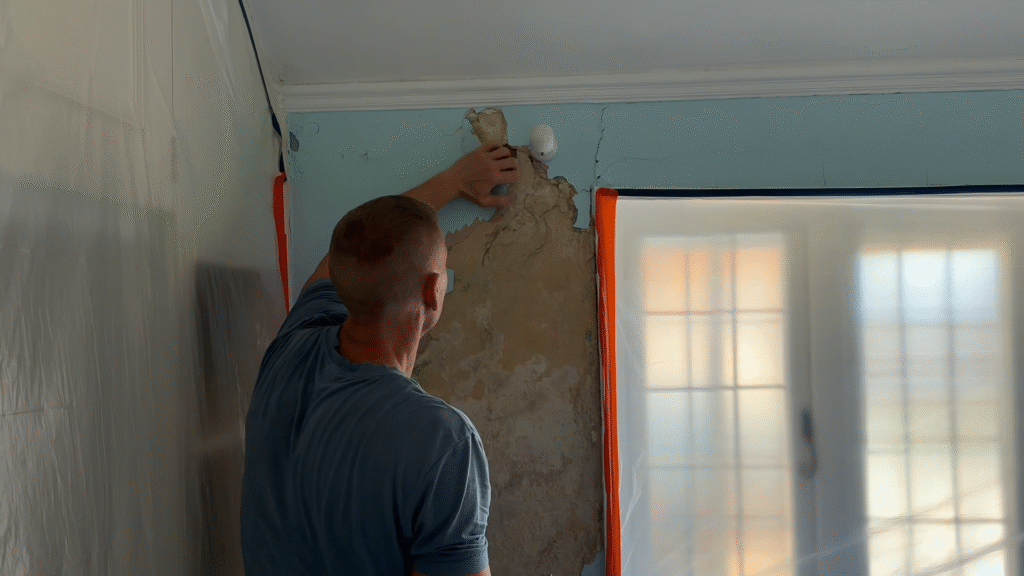
If the surface beneath the paint feels powdery or dusty (known as distemper), it must be fully removed. Plastering over this unstable layer will result in poor adhesion and future delamination.
Pro Tip: Always remove as much loose and flaky material as possible before applying primer or filler. The cleaner your base, the stronger your repair.
Step 3: Crack Repair and Reinforcement
Cracks, particularly those above windows or doors (common stress points), need special attention. Daniel Lee recommends using sealant glue and reinforcement mesh for a long-lasting solution.
Process:
- Cut out each crack to remove loose edges.
- Apply a high-strength adhesive or sealant glue to fill the gap.
- Embed a fiberglass or render mesh over the repaired area.
- Allow it to dry completely before priming.
This method ensures the repaired area resists future cracking, especially in zones prone to structural movement.
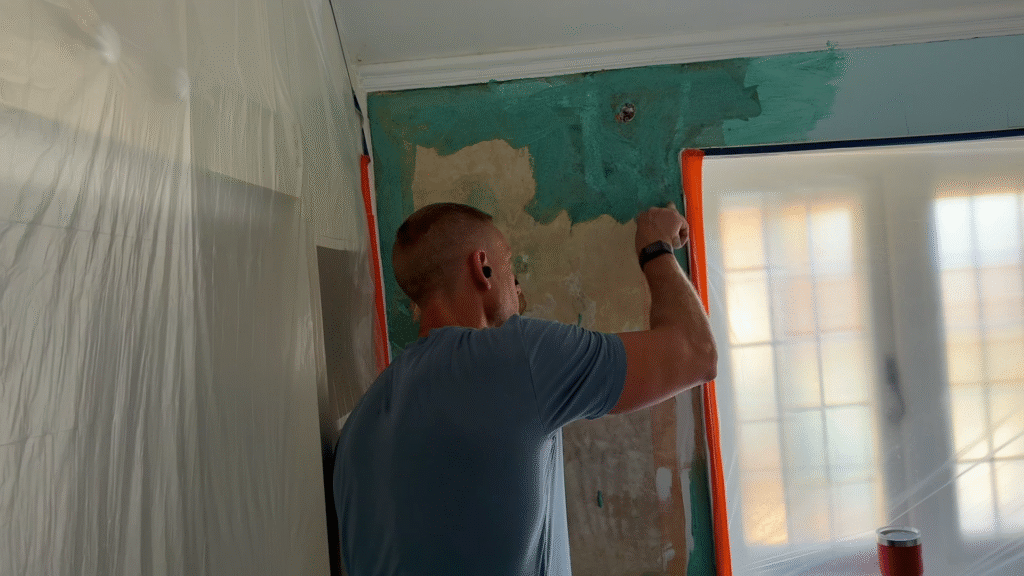
Step 4: Priming the Surface
Priming is critical for adhesion. Use a stabilizing solution, not standard PVA (SBR) glue. A proper stabilizer seals the surface and binds any remaining dust particles, ensuring the new plaster grips securely.
Why Stabilizing Primer Matters:
- Prevents delamination of new plaster.
- Strengthens the substrate.
- Creates an even, absorbent surface.
Some primers, like those Daniel uses, also contain a fine aggregate to enhance bonding and make feathering edges easier during plastering.
Step 5: Mixing and Applying Plaster
With the wall prepped and primed, it’s time to mix your plaster. For small repair areas, a 2-liter batch is often enough.
Key Mixing Tips:
- Add any accelerator (half-time additive) to the water before adding plaster powder.
- Use approximately 1 liter of water per square meter of plaster.
- Clean tools immediately after use to prevent plaster from hardening on them.
Apply the plaster in thin layers (3–4mm), ensuring it smoothly blends with the surrounding wall. Feather edges carefully to create a seamless finish.
Pro Tip: If you overwork plaster with a steel trowel, it can become greasy and saggy. Apply firmly, flatten once, and allow it to set before final smoothing.
Step 6: Flattening, Feathering, and Finishing
As the plaster begins to set, use a flexible steel trowel (0.3mm thickness) to flatten and feather edges. Keep a small amount of water handy for blending transitions, especially around edges or ceiling lines.
Once the plaster reaches a touch-dry stage, you can smooth the surface further using a wet brush or sponge float to eliminate lines or imperfections.
Finally, clean up any edges using grime wipes or a damp cloth — they remove residual primer, plaster smudges, and dust effectively.
Step 7: Cleanup and Final Touches
When the repair is complete, reinstall any fixtures like curtain poles and remove all protective coverings. A well-prepared and cleaned room not only showcases your workmanship but also prevents dust from spreading to other areas.
The finished surface should look seamless, smooth, and solid — ready for painting or decoration.
Maintenance Tips to Prevent Future Damage
Once repaired, protect your investment by maintaining your home’s exterior. Preventative care dramatically reduces the risk of water damage returning.
Maintenance Checklist:
- Inspect exterior render annually for cracks or bulges.
- Clean gutters and downpipes to prevent water overflow.
- Check roof tiles and flashing regularly for leaks.
- Repaint or reseal render surfaces as needed to maintain waterproofing.
Consistent upkeep ensures that your walls stay dry and your plaster remains intact for years.
Final Thoughts: The Key to Professional Plaster Repair
Repairing damaged plaster isn’t just about patching cracks — it’s about understanding the source of the problem and applying a methodical, professional process. From proper preparation to stabilization, reinforcement, and finishing, every step plays a crucial role in achieving a lasting, high-quality result.
Whether you’re a DIY enthusiast or a professional plasterer, following these steps ensures your repair work looks pristine and stands the test of time.
Ready to Restore Your Walls?
If your home has suffered from water damage or render failure, don’t wait until it worsens. Apply these professional plaster repair techniques or contact an expert plastering service to get your walls looking flawless again.
Did you find this guide helpful? Share it with others, leave a comment below, or explore more of our expert plastering and rendering tips for homeowners and tradespeople alike.


