Get 10% descount on first project
Transforming Old Render into a Bulletproof Finish with EWI Premium Base Coat
Introduction
If you’ve ever dealt with cracked or failing render on your home’s exterior, you know how frustrating it can be. Old render systems, especially those applied over timber frame extensions with sand and cement, are prone to cracking, separating, and eventually falling away. The good news? With the right approach and premium materials, you can transform tired, damaged render into a bulletproof finish that not only looks fantastic but also stands the test of time.
In this guide, we’ll walk you through the process of restoring an old rendered surface using EWI’s premium base coat system, reinforced with stainless steel mechanical fixings, PVC beads, and expansion joints. Whether you’re a homeowner curious about the process or a tradesperson looking to refine your skills, this detailed breakdown will give you practical insights and professional tips.
Why Old Render Systems Fail
Before diving into the transformation process, it’s important to understand why older render systems often break down.
- Outdated Materials: Many older extensions were built using timber frames covered with sheets of ply and finished with sand and cement. This method, while common a decade ago, is no longer recommended.
- Cracking and Movement: Timber structures naturally expand and contract. Without proper expansion joints or flexible materials, cracks inevitably appear.
- Water Penetration: Once cracks form, water seeps in, weakening the render further and causing chunks to detach.
The result is what we often see on older homes—deep cracks, crumbling sections, and a surface in desperate need of repair.
Step 1: Assessing the Damage
The first step is to thoroughly inspect the wall. In the case shown here, severe cracks had formed where new meets old—specifically between the original structure and the timber frame extension. Expansion joints were missing, and several large sections of render had already detached.
Key takeaway: Pay special attention to junctions between old and new structures, as these are the most vulnerable points. Expansion joints are essential in preventing further cracking.
Step 2: Preparing the Surface
Preparation is crucial for ensuring the new render system adheres properly.
- Cleaning the wall: Remove any loose or crumbling render.
- Priming: Apply primer in dry conditions only. Applying primer in the rain can cause streaks, runs, and poor adhesion.
- Taping and protection: Use high-quality render tape (such as EWI’s recommended tape) and drop sheets to protect surrounding areas like windows, drains, and ground surfaces.
This step lays the foundation for a clean, professional finish.
Step 3: Adding Beads and Expansion Joints
Expansion beads and PVC corner beads play a critical role in preventing future cracks and ensuring neat edges.
- Expansion Beads: Installed where old meets new, these joints allow for natural movement without compromising the render.
- PVC Beads: Provide clean, sharp corners and reinforce edges against impact.
- Mesh Angle Beads: Strengthen vulnerable corners and distribute stress evenly across the surface.
By combining these reinforcements, you create a durable framework for the render system.
Step 4: Applying the Base Coat with Mesh
This is where the transformation really begins. The EWI Premium Base Coat is applied in a methodical, layered process:
- First Layer: A base coat is applied at a thickness of 5–6 mm.
- Embedding Mesh: While still wet, fiberglass mesh is embedded into the base coat, overlapping sheets to ensure seamless coverage.
- Leveling: A thin coat of base material is smoothed over the mesh, flattening and embedding it securely.
The embedded mesh strengthens the render, preventing cracks and reinforcing weak areas. Stainless steel mechanical fixings are also added for maximum stability.
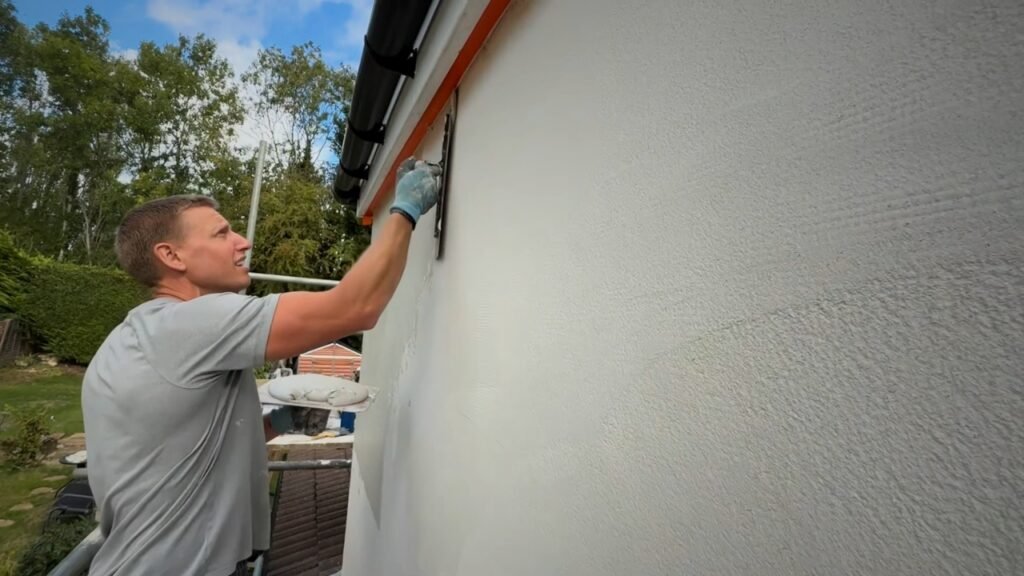
Step 5: Applying the Second Coat
After the first layer has cured, a thin skim coat of premium base coat is applied to smooth out any trowel marks or minor imperfections.
This stage requires precision:
- Use a high-quality flexible trowel (like the Regal and Barnes 0.3 mm flexi trowel) to apply even pressure.
- Blend overlaps seamlessly so no lines are visible.
- Keep the finish tight and flat to prepare for the final decorative coat.
The result is a flawless surface ready for priming and top coat application.
Step 6: Priming and Applying the Top Coat
Once the base coats have fully cured, the wall is ready for priming and finishing.
- Colored Primer: Applied to ensure adhesion and prevent patchiness in the final coat.
- Silicone Top Coat Render: Provides the ultimate protective layer. Silicone renders are breathable, flexible, and resistant to water, dirt, and algae.
This combination not only enhances durability but also gives the wall a fresh, modern look.
Why EWI Premium Base Coat Stands Out
Choosing the right products is just as important as the application process. EWI’s premium base coat system is designed for:
- Strength & Durability: Resistant to cracking and impact.
- Compatibility: Works seamlessly with mesh reinforcement and fixings.
- Flexibility: Adapts to building movements, especially in timber frame structures.
- Professional Finish: Creates a smooth, flawless surface ready for decorative renders.
By investing in high-quality materials, you save time, money, and hassle in the long run.
Tips for a Flawless Finish
Here are some expert tips gathered from this project:
- Always apply primer in dry weather to avoid streaking.
- Install expansion joints wherever old meets new or where movement is likely.
- Protect your work area with proper taping and drop sheets—clean finishes make all the difference.
- Use flexible tools like a 0.3 mm flexi trowel for smooth, seamless application.
- Allow each coat to dry fully before moving on to the next step.
Final Results: From Cracked to Bulletproof
By the end of the process, the once-tired and cracked extension wall was completely transformed. The old render was reinforced, leveled, and finished with a protective system that will resist cracks, weather damage, and wear for years to come.
The result is not only structurally sound but also visually stunning—clean lines, smooth finishes, and a professional look that boosts the home’s curb appeal.
Conclusion & Call-to-Action
Repairing old render doesn’t have to be a losing battle. With the right approach—quality preparation, reinforced base coats, proper expansion joints, and premium materials—you can achieve a finish that’s as durable as it is beautiful.
If you’re tackling a similar project, consider EWI’s premium base coat system for a bulletproof solution. And if you found this guide helpful, why not:
- Share it with someone facing the same challenges.
- Comment with your own rendering tips or experiences.
- Explore more of our articles for expert advice on rendering, insulation, and exterior finishes.
Your home deserves the best protection—and with the right system, it can stay strong and stylish for decades to come.


