Get 10% descount on first project
Satisfying Ceiling Transformation: From Water Damage to a Perfect Plaster Finish
When water damage strikes, your ceiling can quickly go from polished to problematic. But what if the repair process itself could be just as satisfying to watch as the final result? In this blog, we’re diving into a recent ceiling plastering project where we took a damaged surface and gave it a complete transformation. Whether you’re a professional plasterer, a DIY enthusiast, or simply someone who appreciates quality craftsmanship, this behind-the-scenes breakdown will give you valuable insights into the tools, techniques, and expert tips that make all the difference.
Project Overview
This ceiling, standing tall at approximately 2.8 meters, required more than just a quick skim. With visible water damage, lath removal, and a need for a seamless finish, it was time to bring in the big guns—and the stilts.
The transformation included:
- Room preparation for safety and cleanliness
- Application of fiber tape to reduce cracking
- Two-coat plastering technique for a perfect finish
- Use of shadow gap beads for a sharp, modern look
Let’s take a closer look at each phase of this rewarding project.
Step 1: Preparing the Workspace
Before a single trowel touches the ceiling, preparation is key.
Clearing the Room
Plastering is a physically demanding job, and safety is paramount. Clearing the room of any hazards ensures a safer environment, especially when using stilts. We made sure:
- All floor areas were protected with drop cloths
- Tools and hop-ups were positioned for easy access
- Trip hazards were eliminated completely
Setting Up Stilts
At 2.8 meters high, the ceiling was out of reach without assistance. Adjustable stilts were set to their highest setting. If you’ve never walked on stilts before, it’s a skill that requires balance and practice—but they offer unmatched mobility for high ceilings.
Step 2: Reinforcement with Fiber Tape
Fiber tape (or scrim) is essential to prevent cracking at the joins between boards.
Why It Matters:
- Reduces risk of cracking
- Strengthens seams and screw head areas
- Enhances long-term durability of the plaster
Even minor things like exposed screw heads can affect the finish, so we added tape over every joint and any visible fasteners. Pro tip: Use scissors or a Stanley knife to make clean cuts, and double-check for any protruding screws that might tear your trowel.
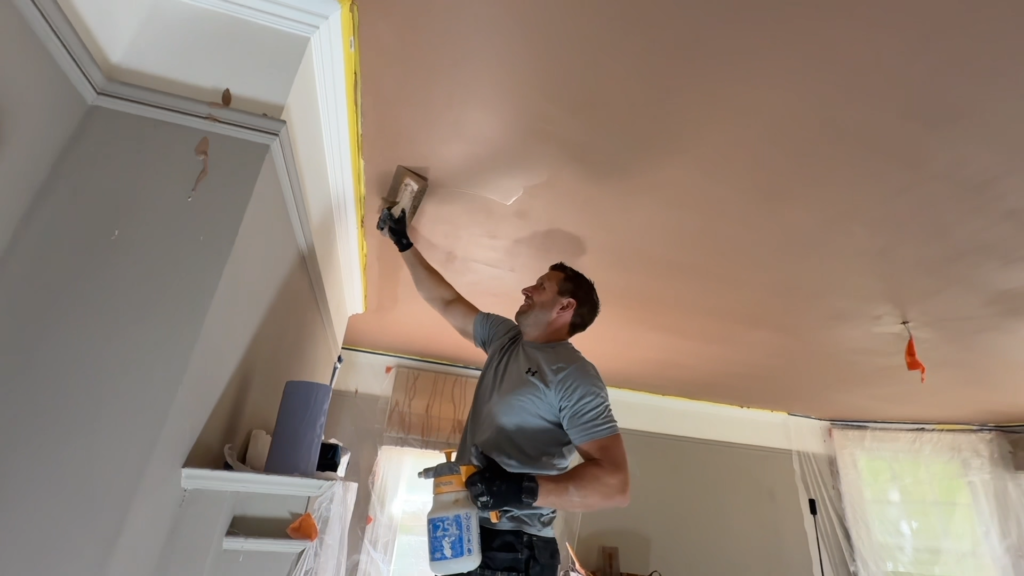
Step 3: Mixing and Applying the Plaster
Mixing the First Batch
Once the prep work was done, it was time to mix up the first bags of plaster. Consistency is key—too thick and it’s hard to apply, too thin and it won’t adhere properly.
First Coat Application
Using broad sweeping motions, the first coat was spread evenly across the ceiling. A time-lapse might make it look easy, but this part demands precision and speed. Applying plaster overhead is strenuous, which is why keeping energy up with quick snacks (like an orange and banana in our case) helps power through the day.
Step 4: Flattening and Smoothing
After allowing the first coat to tighten for around 10 minutes, we began flattening it using a trowel and a water sprayer.
Tips for Flattening:
- Use a fine mist of water to help the trowel glide
- Work in overlapping sections to avoid trowel lines
- Switch hands occasionally to ease arm strain
Multiple passes ensure a level and even finish. For larger ceilings, a team approach helps make the job smoother and faster.
Step 5: Applying the Second Coat
The second coat of plaster is thinner and used to perfect the surface.
Timing is Everything
We allowed another 10-minute wait before wet-troweling again. This final flattening removes any remaining imperfections and gives the ceiling its ultra-smooth finish.
We also use this stage to:
- Remove protective tape from shadow gap beads
- Clean up all bead edges and corners for a crisp finish
Step 6: Shadow Gap Beadwork and Final Touches
Shadow gap beads are a modern detail that adds sleekness to ceiling transitions.
Cleaning and Detailing
We carefully removed the tape protecting the shadow gap beads and cleaned the edges. The coving and corners received extra attention to ensure they were free of smears and excess plaster.
Why Shadow Gaps Matter:
- Create a floating ceiling effect
- Eliminate need for coving in some cases
- Add architectural interest to modern interiors
Once dry, all that’s left is decorating—but even bare, the ceiling already looked like a work of art.
Key Tools Used
- Adjustable plastering stilts
- Fiber scrim tape
- Trowel and water sprayer
- Mixing buckets and paddle mixer
- Shadow gap beads
- Protective floor coverings
Final Result: A Crisp, Professional Finish
From a damaged and uneven surface to a sleek, modern ceiling, this project was a prime example of the transformative power of professional plastering. The right preparation, tools, and timing make all the difference.
Watching a ceiling transformation like this is not only satisfying but educational—every step has a purpose, and skipping any of them could mean compromising the result.


