Get 10% descount on first project
Spray Applied Weber OCR + Mesh in Surrey: A Professional Render System in Action
When it comes to achieving a flawless finish with long-term durability, using Weber One Coat Render (OCR) combined with mesh reinforcement can be a game changer. In this project, we take you behind the scenes of a professional rendering job in Surrey, showcasing every step — from preparation and machine setup to application, finishing, and cleanup. Whether you’re a rendering pro, a builder, or a curious homeowner, this blog post breaks down the process in a detailed yet accessible way.
Why Weber OCR and Mesh?
Weber OCR is a pre-blended cementitious render designed for efficient spray or hand application. Combined with reinforcement mesh, this system enhances surface strength, minimizes cracking, and provides a consistent, breathable finish. It’s especially ideal for:
- Large surface areas
- Uneven or damaged walls
- Projects requiring speed without compromising quality
In this Surrey-based project, a mix of old and new walls required robust treatment — making Weber OCR the perfect choice.
Step 1: Setting Up the Render Pump
Before any material is applied, it’s crucial to ensure the render pump system is correctly prepared.
- Flushing the Water: First, the water in the pipes is flushed to lubricate the lines and prepare them for the render mix.
- Mixing Strategy: A 45-liter pump (equivalent to three 25kg bags) is used. Five bags are mixed at a time to maintain a consistent flow without delays.
The pump is the backbone of this operation. Although powerful, it’s delicate and requires regular maintenance and cleaning to avoid costly malfunctions or blockages.
Step 2: Applying the Scratch Coat
The initial render layer (scratch coat) is essential for a strong finish. Here’s how it was handled:
- Dealing with Old Bricks: The wall was quite old, and the bricks were soft due to previous render removal. This made deep filling necessary.
- Thickness Matters: A common rendering mistake is having a thin scratch coat under a thick topcoat. Here, the scratch coat was intentionally built up (sometimes 12–14mm) to provide a stable base.
- Tool of Choice: The spray render pump helps apply a thick, even layer effortlessly — saving time and effort compared to traditional trowel methods.
After spraying, the surface is ruled off to identify hollows, which are filled immediately.
Step 3: Mesh Reinforcement
Mesh is applied directly onto the wet base coat.
- Why Use Mesh? It significantly strengthens the wall, reducing the risk of cracks and movement over time.
- Placement: It’s placed while the render is still pliable, allowing it to bond properly within the layer.
Step 4: Surface Prep Before Topcoat
Once the scratch coat dries (not fully dry, just firm), the surface must be cleaned:
- Dust Removal: A blower is used to clear dust and debris.
- Water Soaking: Warm weather means higher suction. So the walls — especially sun-exposed sections — are soaked to reduce rapid drying and improve adhesion.
Each section is treated based on sun exposure, showing how weather impacts rendering prep.
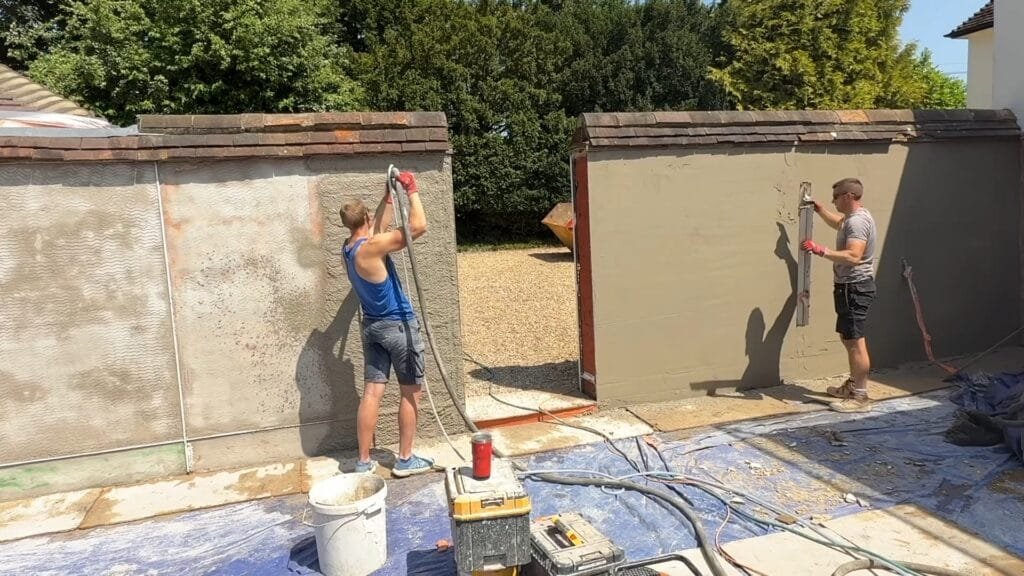
Step 5: Spray Application of the Topcoat
- Nozzle Size: A 12mm nozzle is ideal for this thick base coat. A smaller 10mm nozzle might be used for thinner finishes.
- Application Technique: Start from the bottom-right (for right-handers) and work left. One-meter sections help keep pace with the team.
- Render Volume: This particular wall consumed around 40 bags — emphasizing the scale of the job.
The team works in harmony: one person sprays, another rules off, and a third manages the mix. The key to success is synchronization.
Step 6: Ruling and Floating
Once sprayed:
- Derby Rule: A 4-ft or 6-ft straightedge ensures flatness and fills in low points.
- Power Float: This circular tool creates a smooth, even surface, making it ideal before a final silicone coat.
Areas in the shade tend to stay wetter, requiring more attention during ruling and floating. Timing is crucial: too dry, and you risk cracking; too wet, and it’s unworkable.
Step 7: Final Touches and Holler Filling
Despite precise spraying, some minor hollow areas will always appear:
- Filling Hollows: Identified and filled with a trowel.
- Re-Floating: Power float runs again over filled spots to ensure seamlessness.
Pro Tip: The power float saves time but still demands physical effort. It also provides a more consistent texture compared to hand floating.
Step 8: Cleaning and Prevention
Clean-up is just as important:
- Protecting Surfaces: Tiles and concrete are brushed clean. If needed, wire brushes or patio cleaners can be used.
- Daily Rinse: The wall is misted with water to prevent premature drying and hairline cracks.
- Tool Maintenance: The pump and its parts are cleaned meticulously after each use — similar to cleaning medical equipment.
Real-Life Lessons and Expert Tips
- Expect a Learning Curve: Early misuse of the pump led to part replacements. Now, it’s second nature — highlighting the importance of training.
- Render Mix Quality: Proper mixing avoids blockages. Never rush this step.
- Weather Awareness: Temperature and sun exposure can drastically affect render behavior. Adapt accordingly.
Final Thoughts: The Power of a Professional Render System
This section of wall — just one part of a 360m² project — now has a durable, flat, reinforced base ready for the silicone topcoat. Spray application combined with expert prep, ruling, and floating has resulted in a professional finish with efficiency and precision.
Whether you’re considering rendering your own home or are a tradesperson looking to upgrade your methods, Weber OCR with mesh reinforcement and a spray system is a proven choice.
Enjoyed this behind-the-scenes look at a pro render job in Surrey?
- 👍 Like this post if you found it helpful
- 💬 Comment with any questions or your own rendering tips
- 🔗 Visit DanielLeePlastering.com for more render guides and professional services
- 📺 Watch the full video on YouTube: Spray Applied Weber OCR + Mesh in Surrey
Stay tuned for more real-world rendering tutorials, product breakdowns, and expert insights.


